Amazon Web Services (AWS)
This tutorial has been designed for use on Amazon Web Services (AWS) cloud computing. Other cloud computing platforms may be used, but the instructions below will have to be modified accordingly.
In order to complete this tutorial on AWS, one must launch an EC2 instance that is configured with the proper environment, software, and library dependencies. In addition to a number of library dependencies, the primary software and utilities include:
- Docker (required)
- Singularity (required)
- wgrib2
- ncview
- ImageMagick
Building the proper AWS environment can be achieved in two ways:
| Launch an EC2 instance from the DTC maintained AMI | Build & configure the EC2 instance from scratch |
|---|---|
| An AMI (Amazon Machine Image) is simply a saved copy of the EC2 environment that can be used to launch a new EC2 Instance with all of these software and tools pre-installed, allowing the user to quickly launch the proper EC2 Instance and begin the tutorial. Read more about AMIs here. The DTC maintains and provides a public AMI called "dtc-utility-base-env_v4.1.0" that contains all of these required tools. | Steps are provided to install all of the required software and tools from scratch. The user may then create an AMI if they choose, and may additionally choose to include tutorial specific content (e.g. data, container images, scripts) in their AMI as well, depending on user needs. |
Follow the instructions below for the preferred choice of acquiring the AWS environment:
Below you will find steps to create an EC2 Instance from the DTC AMI called "dtc-utility-base-env_v4.1.0", and login to your new instance from a terminal window.
See AWS documentation for more information
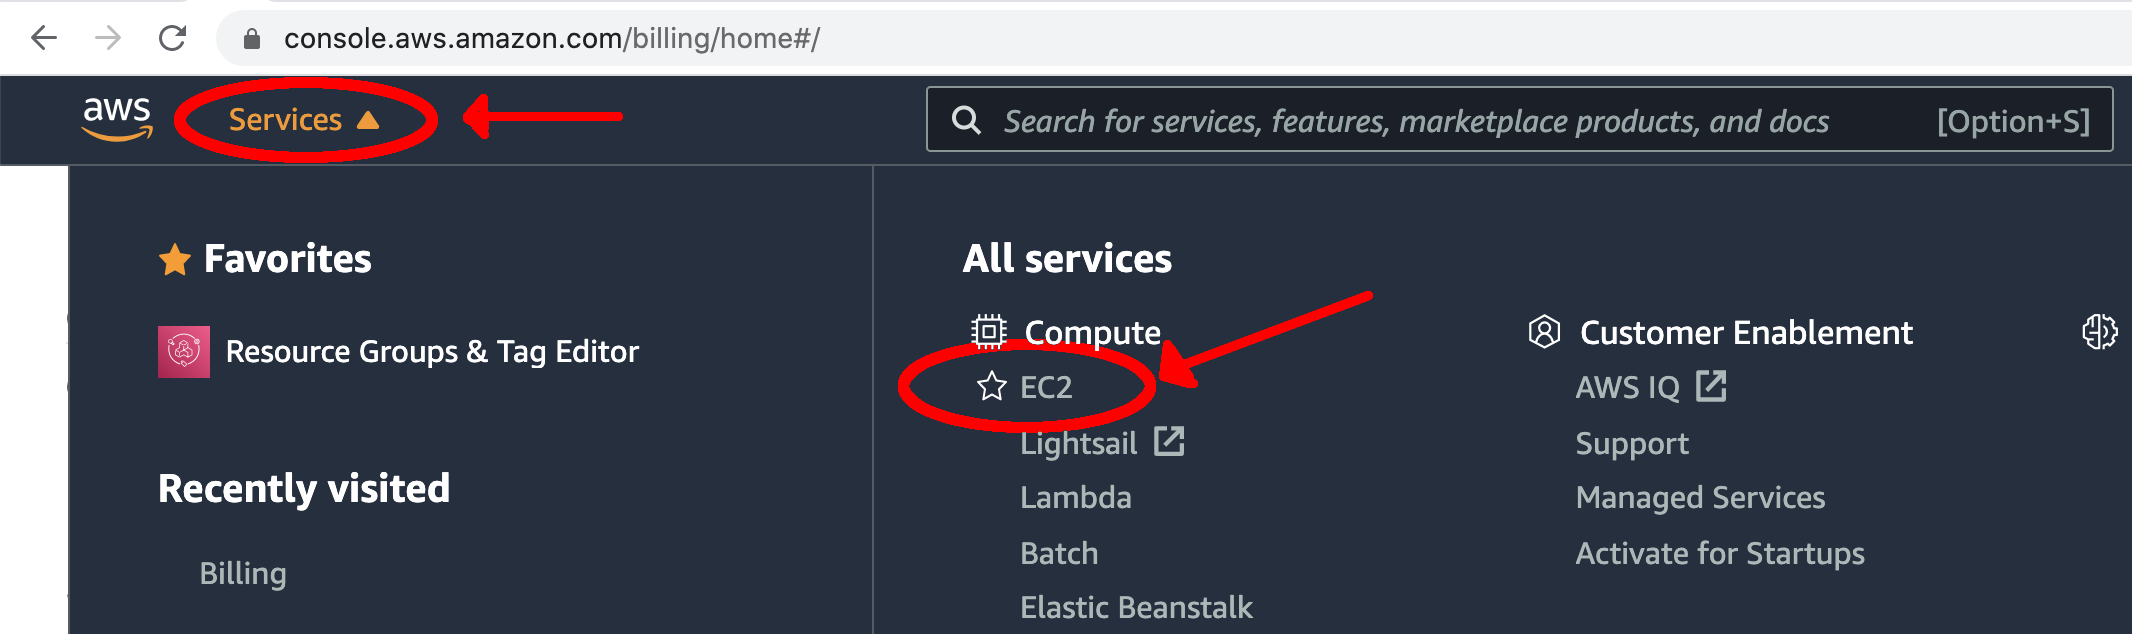
- Navigate to Amazon’s Elastic Compute Cloud (EC2) Management Console by clicking on the "Services" tab at the top. Under the "Compute" section, select "EC2".
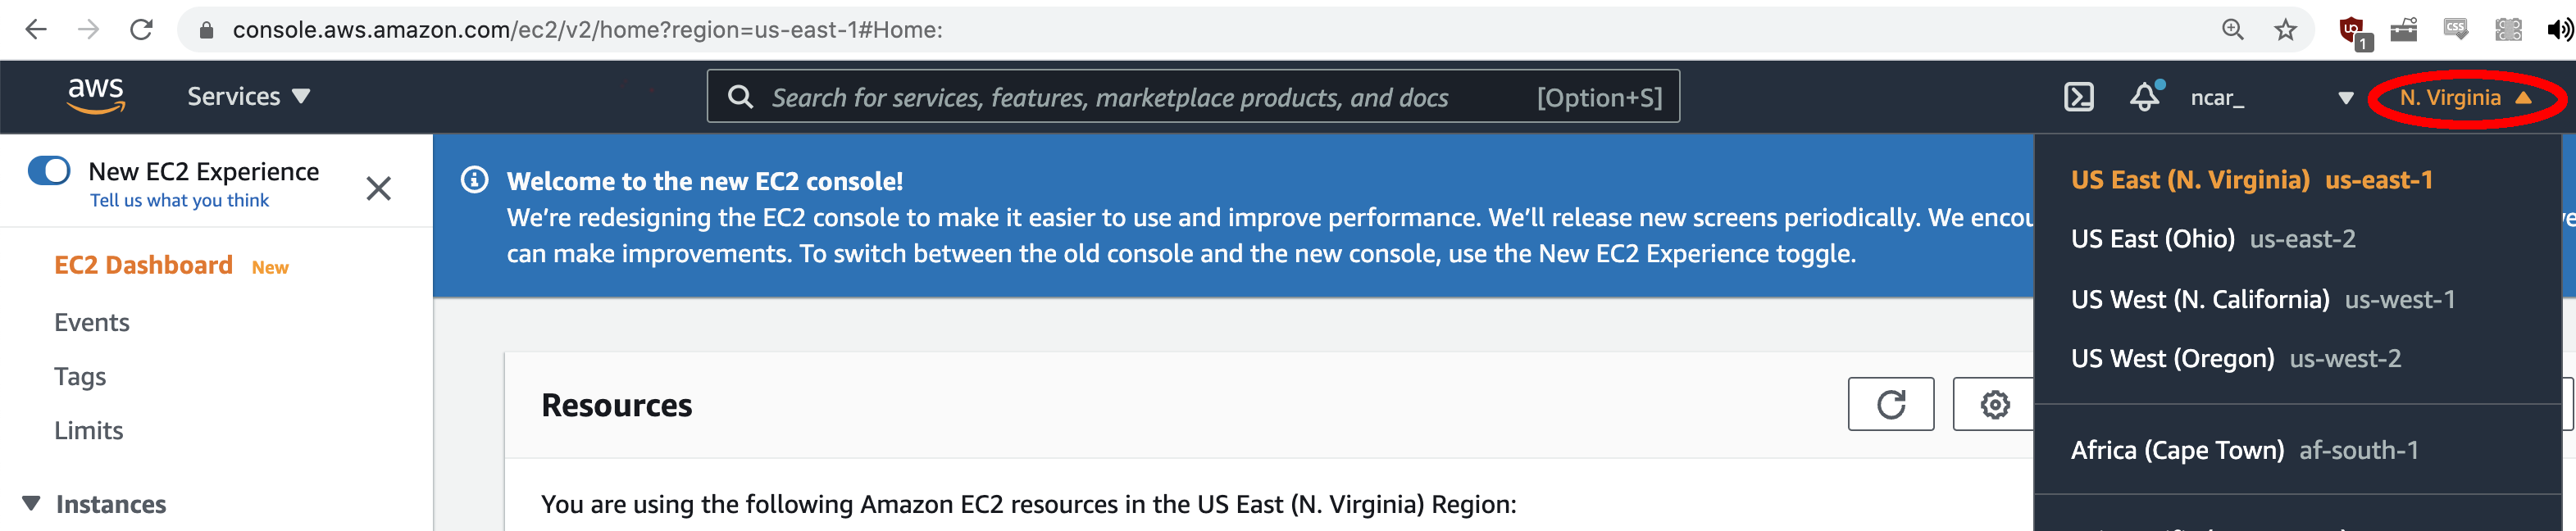
- Determine what region you are running under by looking in the top right corner of the screen. To use the DTC AMI, you need to use the "N. Virginia" region. If this is not what you see, use the drop-down arrow and select the "US East (N. Virginia)" region.
For this tutorial, you can use an environment that has already been established for you: an Amazon Machine Image (AMI).
- Click the "AMIs" link on the left side "EC2 Dashboard"
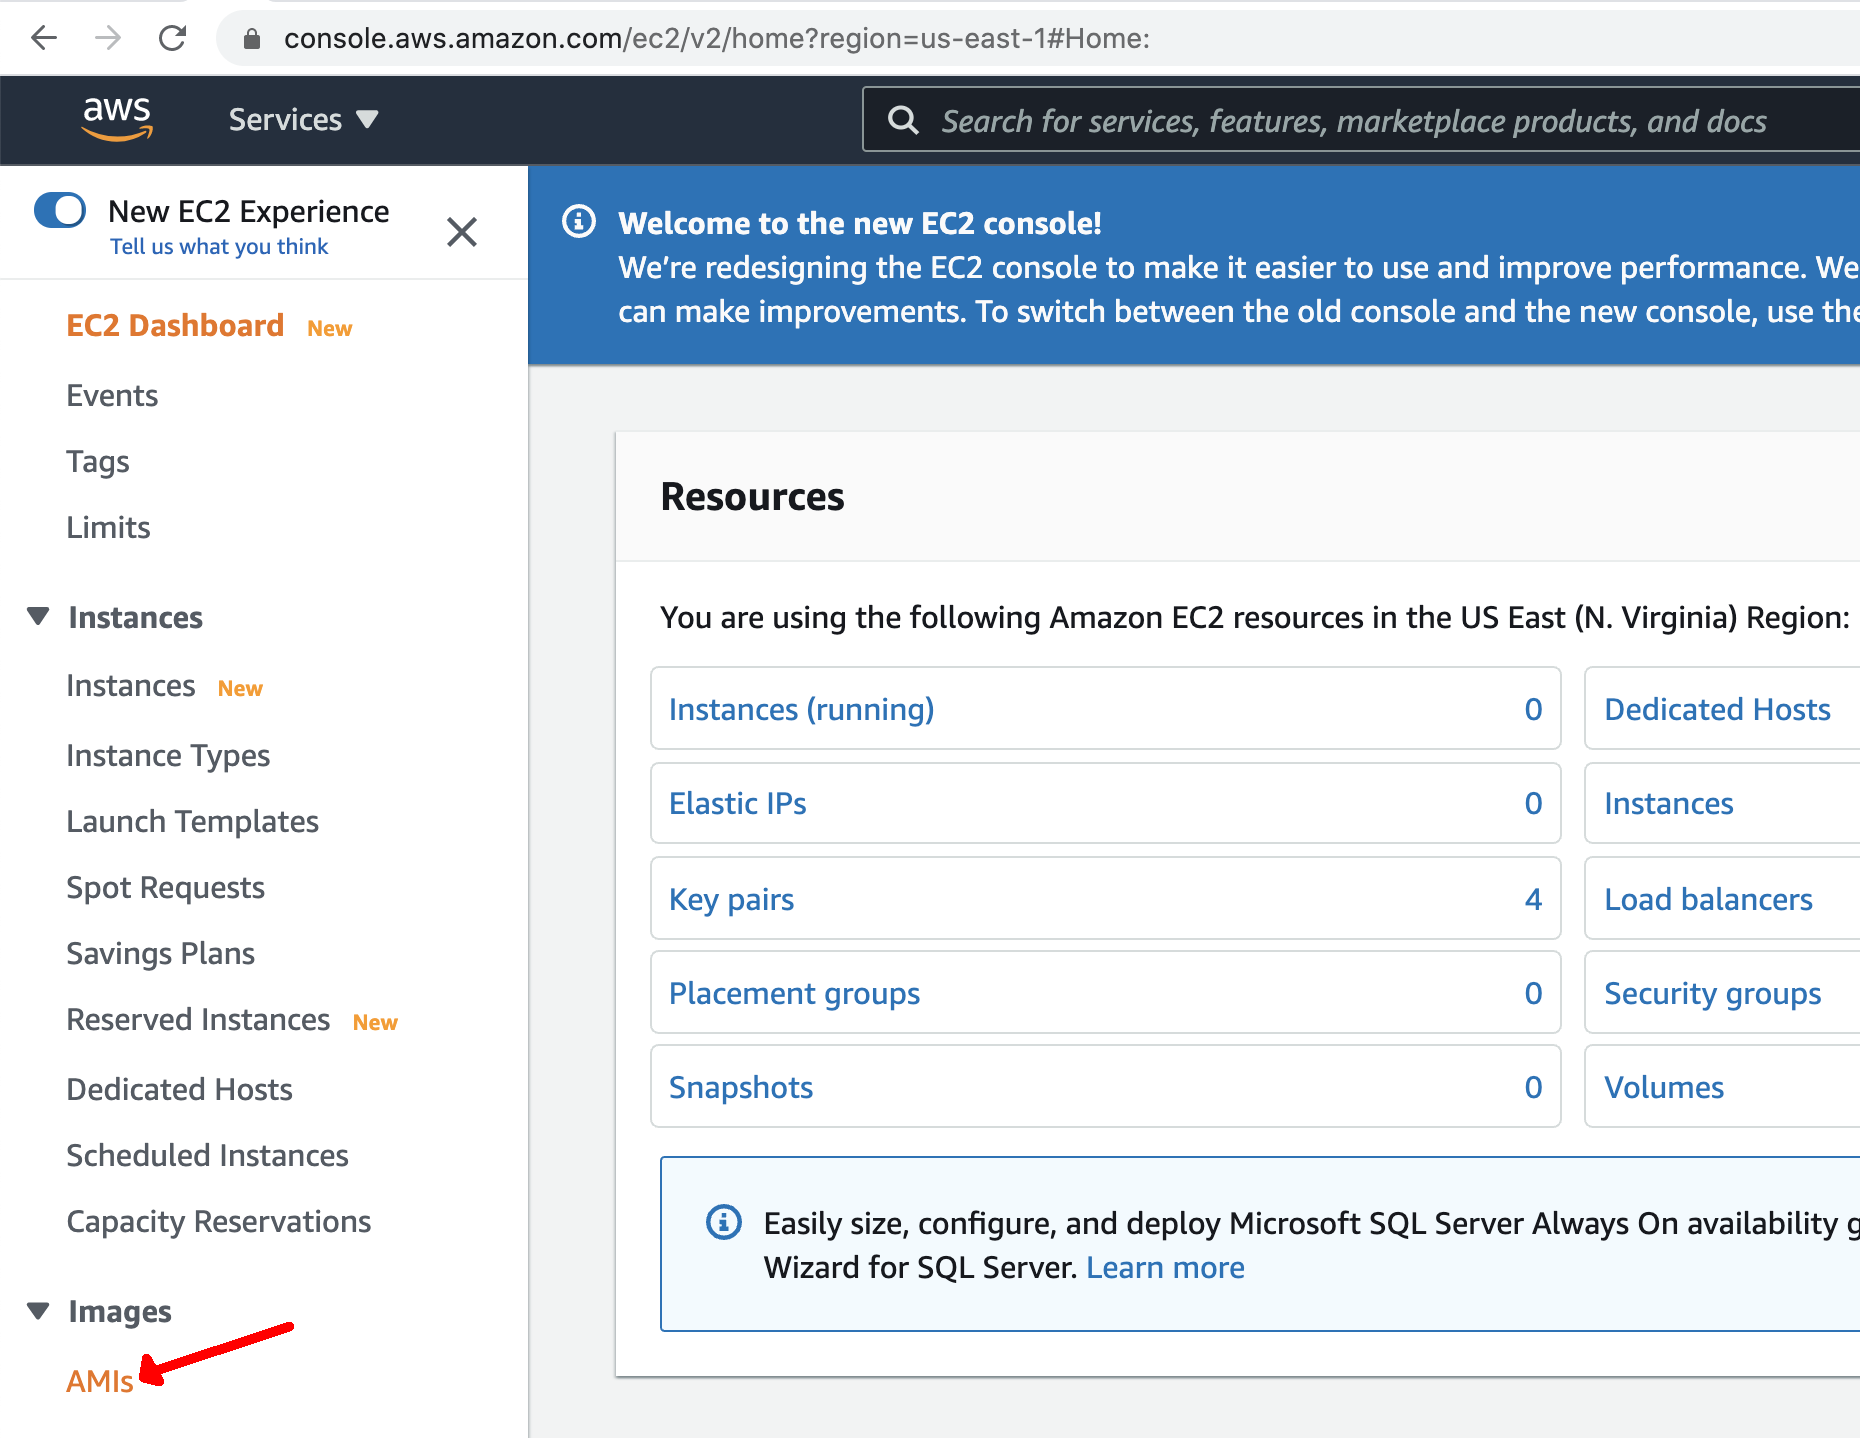
You will initially not see any AMIs listed, since you do not own any images.
- Select "Public Images" from the dropdown as shown.
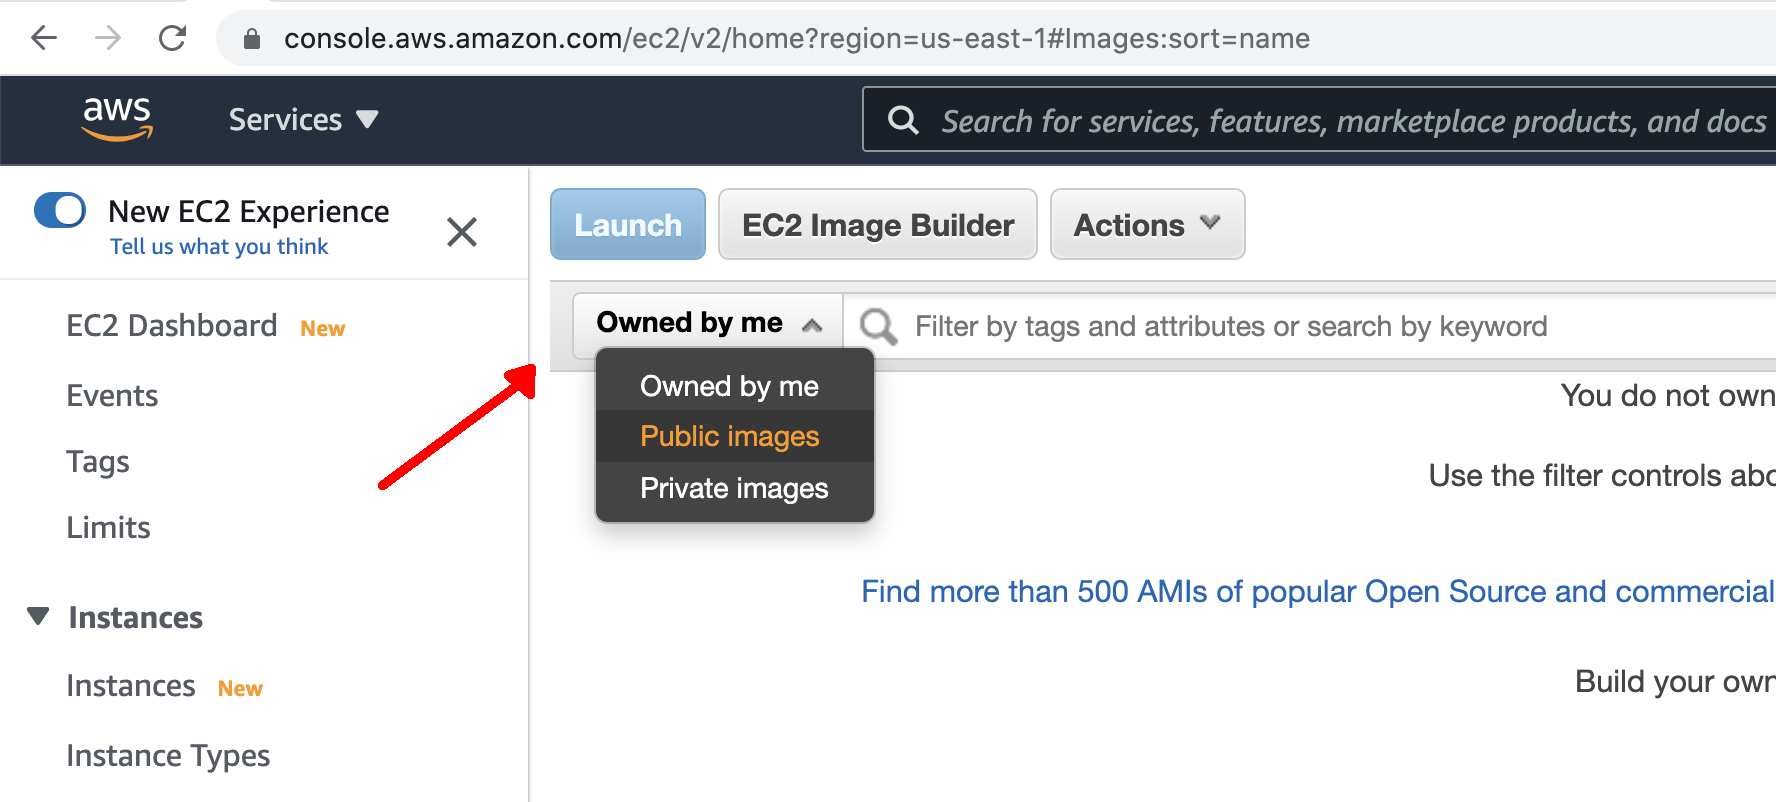
- In the search bar, enter in the name of the DTC AMI: "dtc-utility-base-env_v4.1.0" and press enter.
- Select the resulting AMI from the list window.
- Once selected, click the blue "Launch" button at the top of the page
After launching the AMI, the next step is to configure the instance prior to using it.
- From the "Filter by" dropdown list, select the "c5" option (a "compute-optimized" instance; see this page for more info on AWS instance types) to see a smaller list of possible selections.
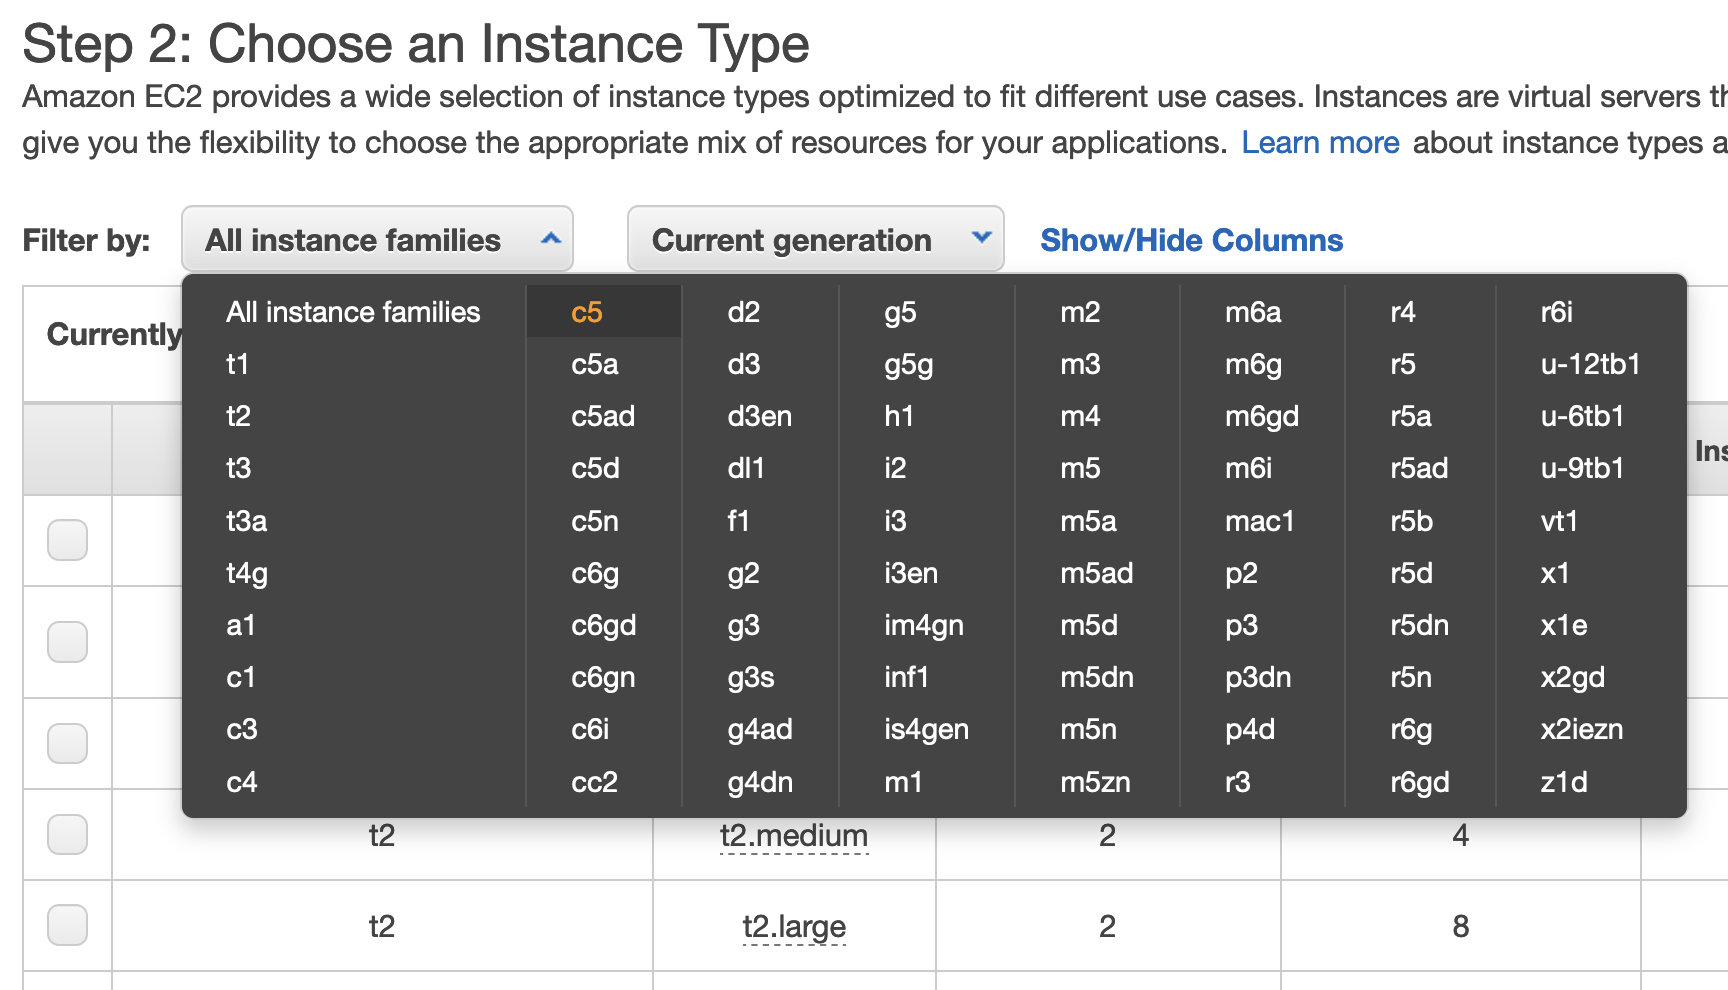
- Scroll down and click the box next to the "c5.4xlarge" instance type and click the "Next: Configure Instance Details" button on the bottom right of the page.
- There is no need to further configure the instance details on the next page so simply click the button the bottom right of the page for "Next: Add Storage"
- If the storage size has not already been increased, change the storage from the default of 8 to 60 Gb and click the "Next: Add Tags" button on the bottom right of the page.
- Add a personal tag to identify what instance is yours.
- Select the blue link in the middle of the page that says "click to add a Name tag". This is a key-value pair where key=Name and value=your_personal_nametag
- On the next page the key will automatically be set to "Name" (leave this as is) and you simply assign a name of your choice to the Value in the second box. The value can be set to anything you will recognize and is unlikely to be used by anyone else. Note, it is not recommended to use any spaces in your name.
- NOTE: The key should literally be called "Name"; do not change the text in the left box
- Click the "Next: Configure Security Group" button on the bottom right of the page.
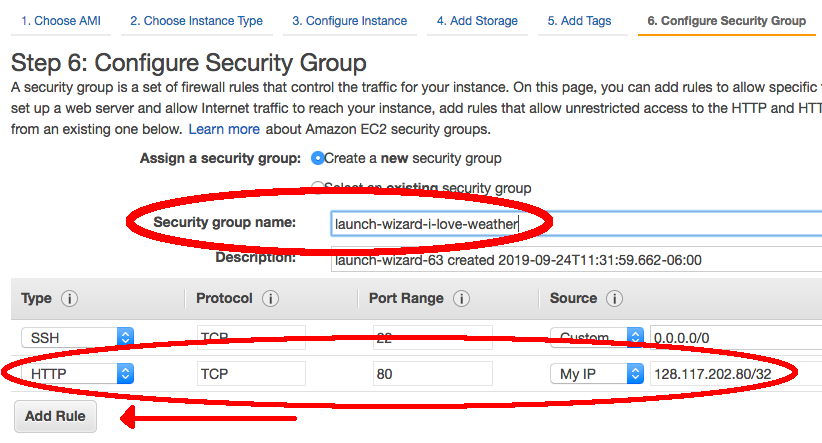
- Amazon requires us to set a unique security group name for each AWS instance. We will also need to set some rules in order to properly set up access to visualize verification output with the METviewer GUI. These steps will both be done on the "Configure Security Group" page.
- The field "Security group name" will be filled in with an automated value. If other tutorial users are attempting to launch an instance with this same automated value, it will fail, so you should replace the given value with any unique group name you desire.
- Select the button on the left hand side that says "Add Rule". Under the drop down menu, select "HTTP". The port range for HTTP is 80.
- Note: Rules with source of 0.0.0.0/0 allow all IP addresses to access your instance. You can modify setting security group rules to allow access from known IP addresses only by clicking the "Custom" drop down menu and selecting "My IP".
- Click the blue "Review and Launch" button at the bottom of the page to continue.
- You can review the selected configuration settings and select the blue "Launch" button in the bottom right corner.
- It will be necessary to create an ssh key pair to allow for SSH access into your instance.
- In the first drop down box, choose "create a new key pair".
- In the second box for the key pair name, choose any name you’d like but make sure it does not include any spaces. (e.g., your_name-aws-ssh)
- Click the "Download Key Pair" button and the key pair will be placed in your local Downloads directory, named: name_you_chose.pem (Note, Some systems will add .txt to the end of the *.pem file name so the file may actually be named name_you_chose.pem.txt)
Windows users: please review Windows information sheet
- To access your instance running in the cloud you first need to set up your ssh access from your remote system
- Open a terminal window and create a new directory to access your AWS cloud instance
mkdir ~/AWS - Go into the new directory and then move your *.pem file into it and change the permissions of the file
cd ~/AWS
mv ~/Downloads/name_you_chose.pem .
chmod 600 name_you_chose.pem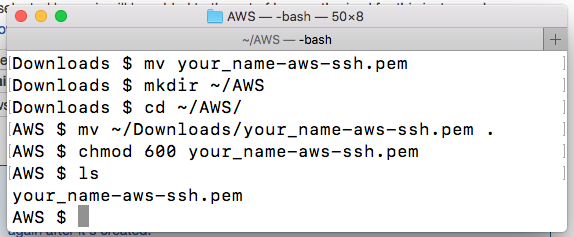
- Open a terminal window and create a new directory to access your AWS cloud instance
- Finally, back in your browser window:
- click "Launch Instances"
- click the blue "View Instances" button on the bottom right corner of the next page.
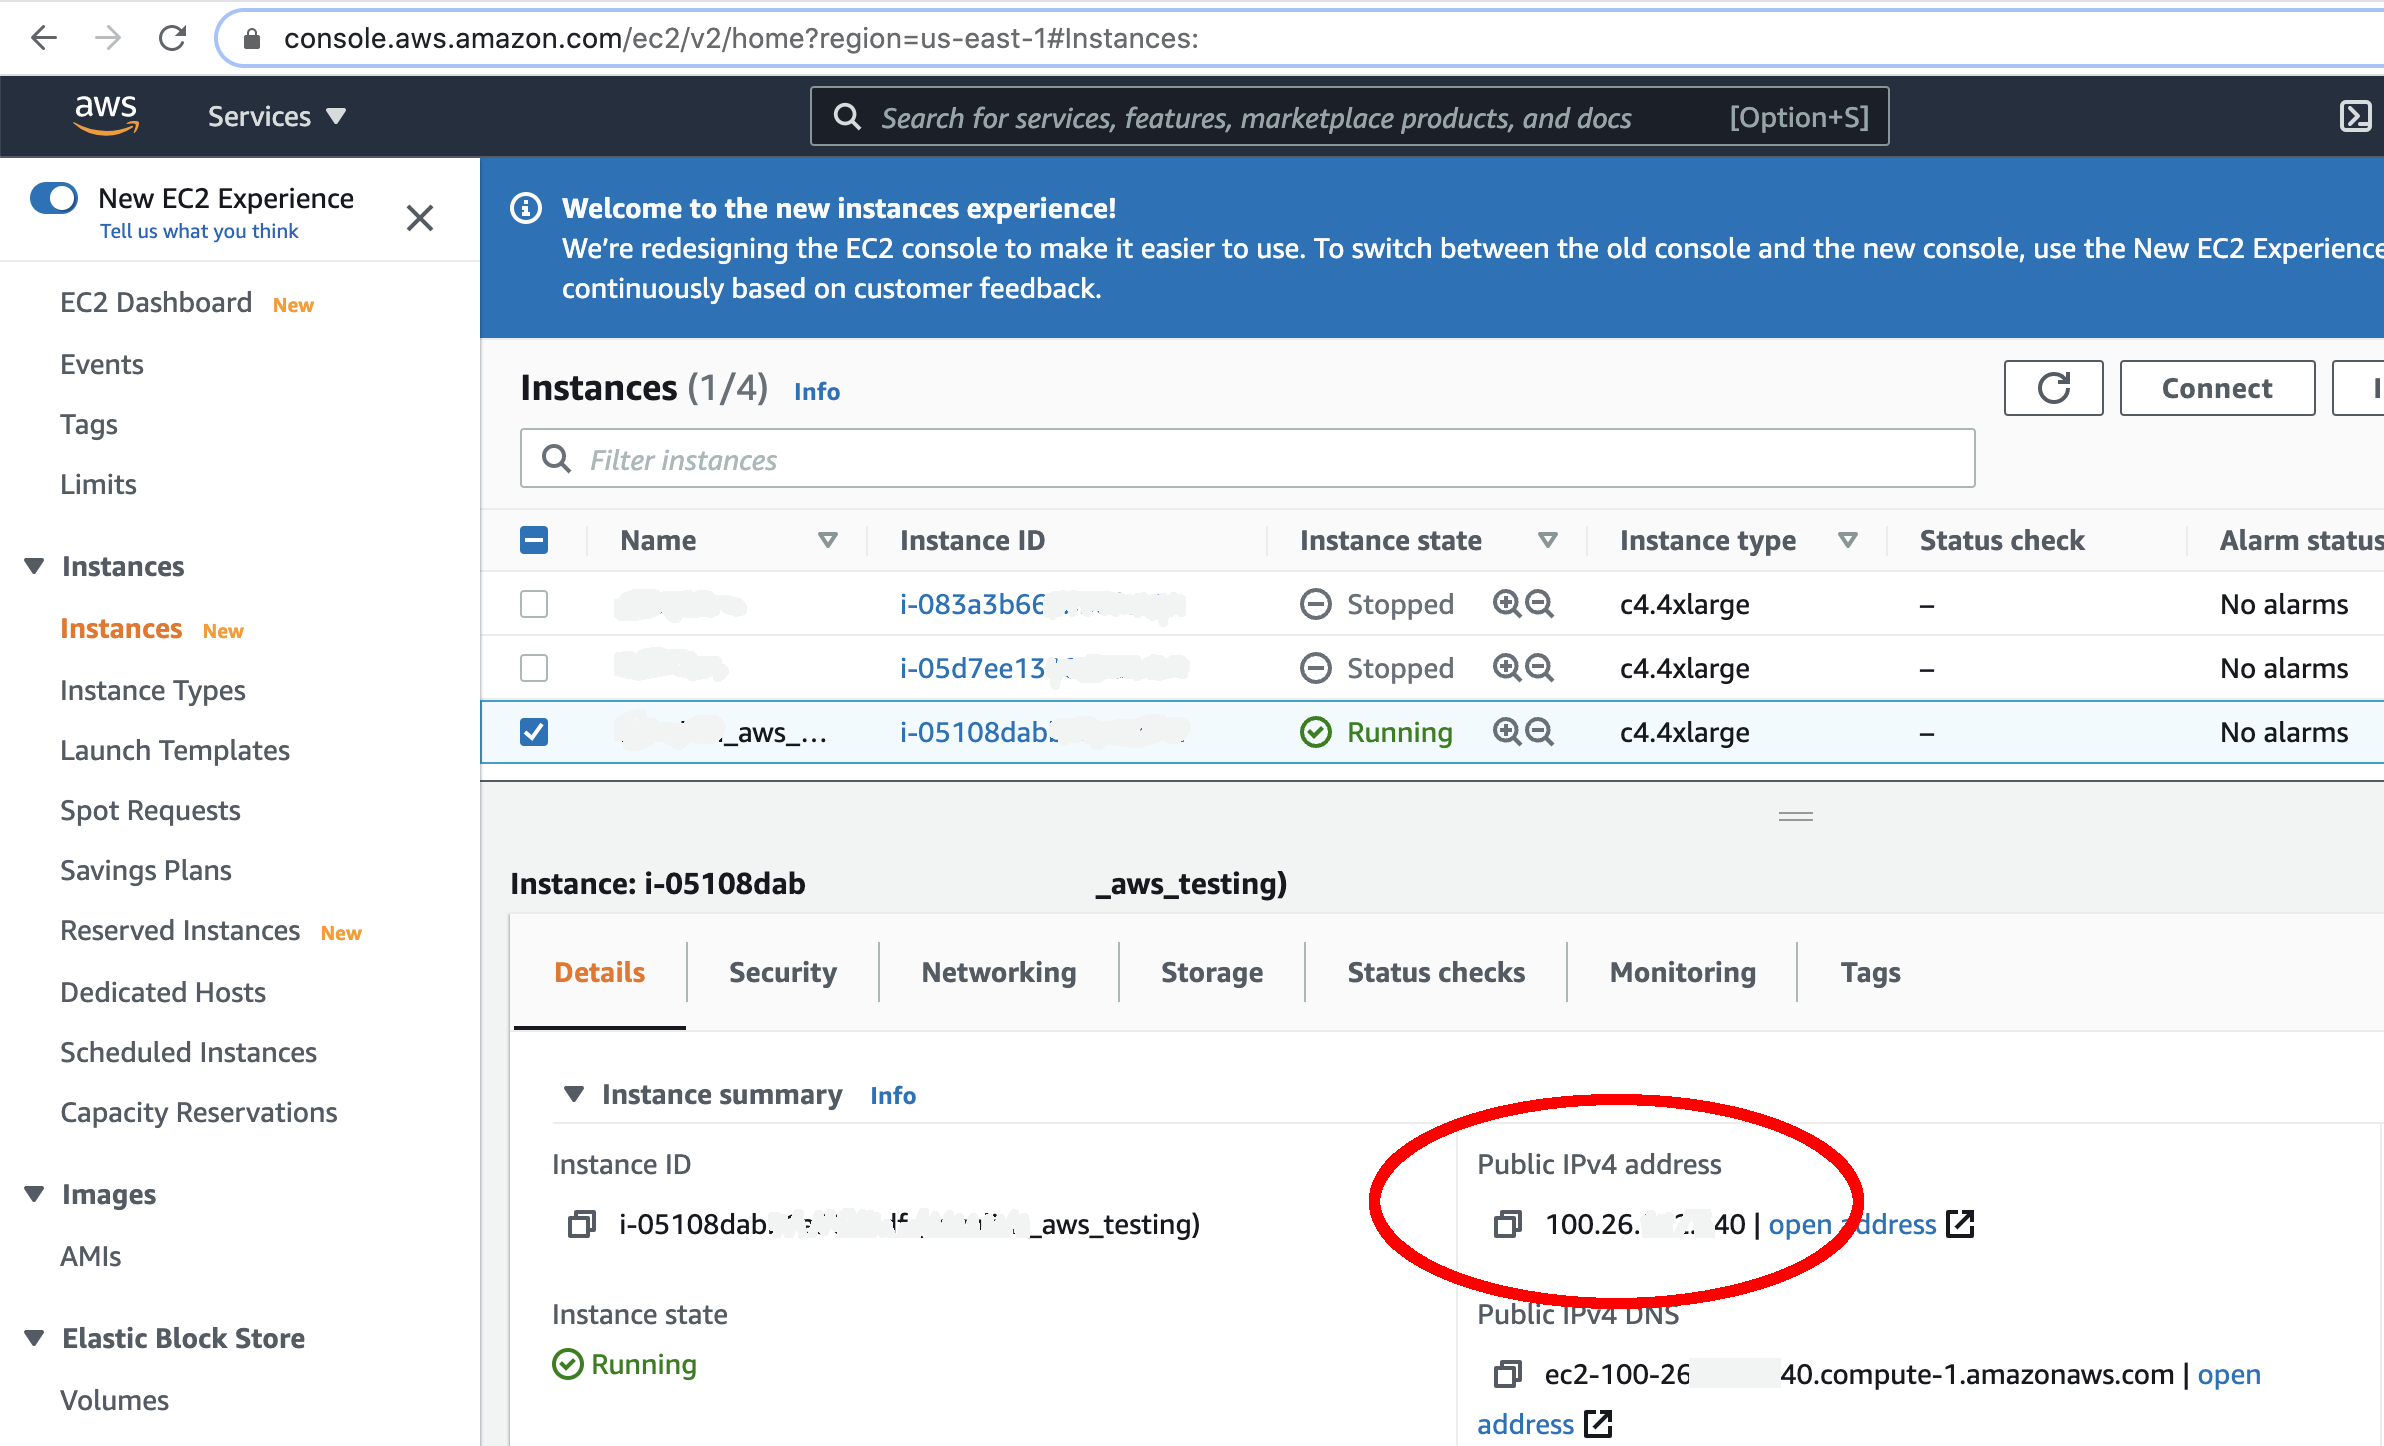
- Look for the instance with the name you gave it. As soon as you see a green dot and "Running" under the "Instance State" column, your instance is ready to use!
- You will need to obtain your IPV4 Public IP from the AWS "Active Instances" web page. This can be found from your AWS instances page as shown below:
- From your newly created AWS directory, ssh into your instance. (Windows users: please review Windows information sheet)
ssh -X -i name_you_chose.pem ec2-user@IPV4_public_IPOR on a mac, change the “X” to a “Y”:
ssh -Y -i name_you_chose.pem ec2-user@IPV4_public_IP - The IPV4 public IP is something that is unique to your particular instance. If you stop/re-start your instance, this public IP will be different each time.
- Feel free to open multiple terminals and log into your instance (using the same credentials) several times if you so desire.
- From this point on, you will mostly be working in your terminal window; however, you may occasionally need to look back at the AWS web page, so be sure to keep the AWS console open in your browser.
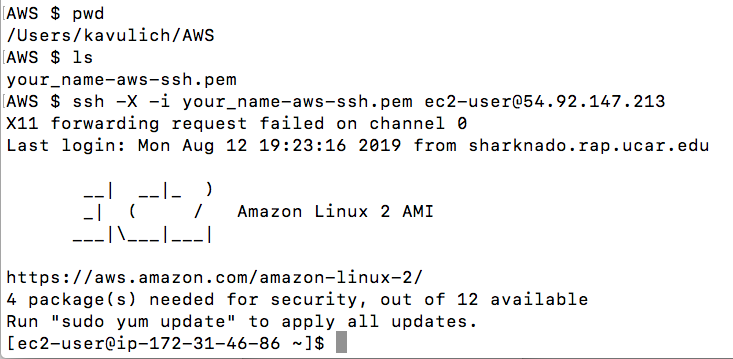
- Once you are in your instance from the terminal window you should see the following set-up:
Below you will find the steps necessary to create an EC2 instance and install the libraries and software required to complete this tutorial, along with a number of helpful utilities to inspect output files created as part of this tutorial.
After completing these steps, you can create your own AMI for future use if you choose. You may also choose to complete the tutorial, or portions of the tutorial, and then create an AMI. For example, suppose you want to include the container images, tutorial repository contents, and input data in your AMI for future use. Simply complete the above steps to create the base environment and software, then complete the tutorial menu items: Repository, Downloading Input Data, and NWP Containers. Then create the AMI. Note that this is a completely customizable procedure and may benefit from some experience/knowledge with AWS AMIs and familiarity with this tutorial first.
Information on creating an AMI of your own can be found in the AWS documentation.
- Select: Amazon Linux 2 AMI (HVM), SSD Volume Type (64 bit/x86)
- Select: C5.4xlarge
- Select: Change storage to 60 GB
- Configure Security Group: Add rule for HTTP (Set Source to MyIP)
(use your own pem file and public IP address from the instance you launched in step 1):
mkdir /home/ec2-user/utilities
Install packages
sudo yum install -y libX11-devel.x86_64 Xaw3d-devel.x86_64 libpng-devel.x86_64 libcurl-devel.x86_64 expat-devel.x86_64 ksh.x86_64
Compile HDF5 from source
wget https://support.hdfgroup.org/ftp/HDF5/releases/hdf5-1.10/hdf5-1.10.5/src/hdf5-1.10.5.tar.gz
tar -xvzf hdf5-1.10.5.tar.gz; rm hdf5-1.10.5.tar.gz
cd hdf5-1.10.5
./configure --with-zlib=/usr/lib64 --prefix=/home/ec2-user/utilities
make install
Compile netCDF from source
wget ftp://ftp.unidata.ucar.edu/pub/netcdf/netcdf-c-4.7.1.tar.gz
tar -xvzf netcdf-c-4.7.1.tar.gz; rm netcdf-c-4.7.1.tar.gz
cd netcdf-c-4.7.1
./configure --prefix=/home/ec2-user/utilities CPPFLAGS=-I/home/ec2-user/utilities/include LDFLAGS=-L/home/ec2-user/utilities/lib
make install
Compile UDUNITS from source
wget ftp://ftp.unidata.ucar.edu/pub/udunits/udunits-2.2.28.tar.gz
tar -xvzf udunits-2.2.28.tar.gz; rm udunits-2.2.28.tar.gz
cd udunits-2.2.28
./configure -prefix=/home/ec2-user/utilities
make install
Compile ncview from source
wget ftp://cirrus.ucsd.edu/pub/ncview/ncview-2.1.7.tar.gz
tar -xvzf ncview-2.1.7.tar.gz; rm ncview-2.1.7.tar.gz
cd ncview-2.1.7
sudo ln -sf /usr/include/X11/Xaw3d /usr/include/X11/Xaw
./configure --with-nc-config=/home/ec2-user/utilities/bin/nc-config --prefix=/home/ec2-user/utilities --with-udunits2_incdir=/home/ec2-user/utilities/include --with-udunits2_libdir=/home/ec2-user/utilities/lib
make install
Install ImageMagick and x11
sudo yum install -y ImageMagick ImageMagick-devel
Install docker
sudo service docker start
sudo usermod -a -G docker ec2-user
Start Docker automatically upon instance creation
Install docker-compose
sudo chmod +x /usr/local/bin/docker-compose
- To ensure that Docker is correctly initialized, one time only you must:
- exit
- Log back in with same IP address
- (DO NOT terminate the instance)
ssh -Y -i file.pem ec2-user@pubIPaddress
Install wgrib2
wget ftp://ftp.cpc.ncep.noaa.gov/wd51we/wgrib2/wgrib2.tgz
tar -xvzf wgrib2.tgz; rm wgrib2.tgz
cd grib2
export CC=`which gcc`
export FC=`which gfortran`
make
make lib
Install Singularity prerequisites
sudo yum update -y
sudo yum install -y openssl-devel libuuid-devel libseccomp-devel wget squashfs-tools
export GO_VERSION=1.13 OS=linux ARCH=amd64
Install Go
sudo tar -C /usr/local -xzvf go${GO_VERSION}.${OS}-${ARCH}.tar.gz; sudo rm go${GO_VERSION}.${OS}-${ARCH}.tar.gz
echo 'export PATH=/usr/local/go/bin:$PATH' >> ~/.bashrc
source ~/.bashrc
Install Singularity
git clone https://github.com/sylabs/singularity.git
cd singularity
git checkout tags/v${SINGULARITY_VERSION}
sudo ./mconfig
sudo make -C builddir
sudo make -C builddir install
sed -i 's/^hstgo=/hstgo=\/usr\/local\/go\/bin\/go/g' mconfig
sudo ./mconfig
sudo make -C builddir
sudo make -C builddir install
Finally, you should enter your home directory and modify the .bashrc and .bash_profile files to properly set the environment each time you log in.
Edits to .bashrc are shown in bold
if [ -f /etc/bashrc ]; then
. /etc/bashrc
fi
# Uncomment the following line if you don't like systemctl's auto-paging feature:
# export SYSTEMD_PAGER=
# User specific aliases and functions
export PATH=/usr/local/go/bin:$PATH
export PROJ_DIR=/home/ec2-user
alias wgrib2="/home/ec2-user/utilities/grib2/wgrib2/wgrib2"
alias ncview="/home/ec2-user/utilities/bin/ncview"
alias ncdump="/home/ec2-user/utilities/bin/ncdump"
Additionally, you should add the following line to ~/.bash_profile:
Then, source the .bash_profile file to enable these new changes to the environment