Contributing Development
The development process for the CCPP and SCM makes use of the tools git and GitHub for code development. There are three code repositories, and new development may be contributed to any or all of them.
The SCM and CCPP components are housed in authoritative (official) repositories. git submodules are used in the SCM to manage the CCPP subcomponents.
- All the authoritative repositories are read-only for users.
- Branches under the authoritative repositories include the main development (main) branch, production branches, and public release branches.
- Branches under the authoritative repositories are protected.
- New development will almost always start from the authoritative repository development branch, so that it can easily be merged.
First steps
1. Setup a GitHub Account. Go to https://github.com and create an account.
2. Create a GitHub issue in the repository where you will be doing development. This allows other developers to review your proposed work, make suggestions, and track progress as you work.
3. Create a fork via github:
- Login to your personal GitHub account
- Go to the official code repository website (e.g. https://github.com/NCAR/ccpp-physics)
- Click on “fork” on the top right corner. You will see the repository in your own GitHub account.

- A fork is a copy of an original repository on your GitHub account. You manage your own fork.
- Forks let you make changes to a project without affecting the original repository.
- You can fetch updates from the original repository.
- You can submit changes to the original repository with pull requests (PRs).
- For more details, please see Working with forks.
Clone the repository
Cloning a repository creates a copy on to your local machine. To begin a new development effort, you will need to start with the latest version of the repository development branch. For the CCPP and SCM repositories, this is the “main” branch. From this branch, you will create a new branch, and add your development there.
1. Clone the authoritative repository:
2. Update your remotes. Git uses a named remote to refer to repositories. By default, “origin” is the name for the repository from which this local copy was cloned. We will rename this to “upstream” and add a new remote for your own fork, for development.
git remote add origin https://github.com/<your_github_username>/ccpp-physics
3. Check out the main branch and create a new branch for your local development
git checkout -b feature/my_new_work
Expert Tip: Starting point for new development
New development will almost always start from the authoritative repository development branch, so that it can easily be merged. While you have been using a release tag for this tutorial, please use the latest code if you plan to contribute new development.
4. Push this branch to your fork as an initial starting point. First confirm your remotes
origin https://github.com/<your_github_username>/ccpp-physics (fetch)
origin https://github.com/<your_github_username>/ccpp-physics (push)
upstream https://github.com/NCAR/ccpp-physics (fetch)
upstream https://github.com/NCAR/ccpp-physics (push)
git push origin feature/my_new_work
Code Development
Now you are ready to begin development by modifying or adding files. Once you have some changes made, you should use your repository fork to archive them.
The git code development process uses frequent updates and detailed log messages to ensure that a detailed record of your changes can be reviewed by others. The basic steps are:
git commit --- to commit all of the changes that have been “added” by git add
git push --- to push these latest changes to your GitHub fork
More information about the git code development process can be found at: https://docs.github.com/en/github/using-git
Additional details describing the code development process for the UFS Weather Model, including how to handle nested submodules, can be found at: https://github.com/ufs-community/ufs-weather-model/wiki/Making-code-changes-in-the-UFS-weather-model-and-its-subcomponents
Pull Requests
A PR tells the code managers that your code changes from your feature branch are ready to undergo a review process for being merged into the main branch in the official repository.
Creating a PR
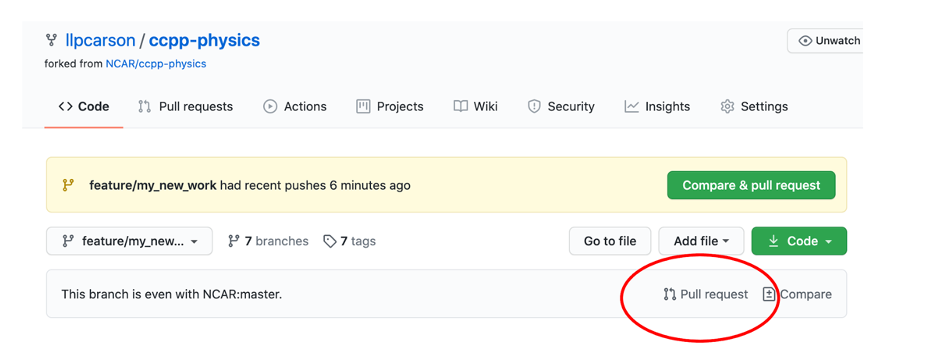
- Go to the your_github_account repository, choose your branch, then click on “Pull request”.

- In the next page, choose base repository and base branch. By default, PRs are based on the parent repository default branch, click “create pull request”.
- Provide a Title. If the PR is for production or release branch, put the production or release branch at the beginning of the title. E.g. “Release/public-v2: update build script.”
- Fill out the template
- Click on “Create Pull Request” or “Create Draft Pull Request” button.
Code review
- Reviews allow collaborators to comment on the changes proposed in pull requests, approve the changes, or request further changes before the pull request is merged.
- Anyone with read access can review and comment on the changes it proposes.
- Developers are expected to address the comments made by the reviewers.
- Reviewers are expected to review the code promptly so that the commit will not be delayed.
- Any code changes can be committed and pushed to your fork, and the PR will automatically update.
Code Commit
- After the code changes have been reviewed and approved by at least one code owner and any additional requested reviewers, the code owners will merge the changes into the main branch.