Python Embedding for Point Data
Python Embedding for Point Data
A Simple Point Data Example with MET Tools
To demonstrate how to use Python Embedding for point data, you will use some test data included with the MET installation, the MET plot_point_obs tool, and the sample Python Embedding script named my_point_pyembed.py that you created earlier in this session. There are three required elements to the command for using Python Embedding with plot_point_obs:
- The path to the plot_point_obs MET executable
- The plot_point_obs nc_file argument, modified for Python Embedding
- The plot_point_obs ps_file argument
Let's build the command!
Element 1: Use your tutorial environment variable MET_BUILD_BASE to access plot_point_obs:
Element 2: The nc_file argument for plot_point_obs. The nc_file argument is typically the path to a netCDF data file containing point observations in a specific MET format created by a MET tool like pb2nc. However, you can also replace this argument with the path to a Python Embedding script. Unlike the gridded data example above, the Python Embedding keyword is included with the Python Embedding script rather than as a separate command line element. Since you are using point data, you will use PYTHON_NUMPY as the Python Embedding keyword. The Python Embedding script being used here only takes a single argument that is the path to the input data file:
Element 3: Choose your own output filename. The plot_point_obs tool outputs an image in PostScript format so typically the filename will end with ".ps":
Let's run the command!
Verify you are in the Python Embedding practice directory:
Copy each of the four elements from above to construct the full Python Embedding command for plot_data_plane:
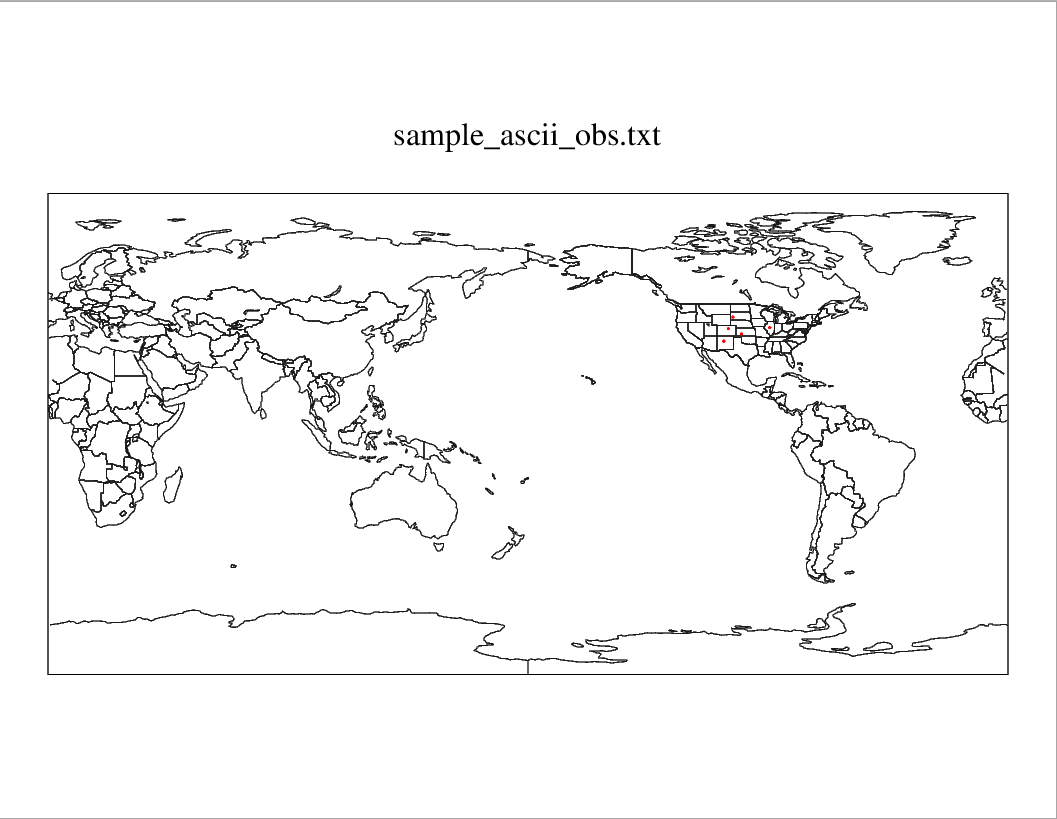
View the output image
The output file is a PostScript graphic file that typically can only be viewed with certain software. If you do not have a display tool that can view PostScript files, you can use the ImageMagick convert command to convert to a PNG file type which may be easier to view:
A Simple Point Data Example with METplus Wrappers
Now instead of using plot_point_obs directly, you will practice the above example using the METplus Wrappers. For each of the three elements shown above, the equivalent configuration items for METplus Wrappers will be described. But first, you will need to set up a basic METplus Wrappers configuration file:
Verify you are in the Python Embedding practice directory:
Open a new file named my_point_pyembed.conf with a text editor:
Some basic elements are required to get the METplus wrappers to run. For this example, you need to provide some time looping information despite not actually looping over those times. You also need to provide a top-level output directory (OUTPUT_BASE):
LOOP_BY=VALID
VALID_BEG=20230101
VALID_END=20230101
VALID_TIME_FMT=%Y%m%d
OUTPUT_BASE={ENV[METPLUS_TUTORIAL_DIR]}/python_embed/wrappers_point_output
For Element 1 above, the METplus Wrappers will find plot_point_obs through the MET_INSTALL_DIR and PROCESS_LIST configuration items:
PROCESS_LIST=PlotPointObs
For Element 2 above, we will use the PLOT_POINT_OBS_INPUT_TEMPLATE configuration item:
For Element 3 above, we will use the PLOT_POINT_OBS_OUTPUT_TEMPLATE configuration item:
Now save the file, and run METplus wrappers:
You can verify that the output image my_point_pyembed_wrappers_plot.ps (which is found in your METplus OUTPUT_BASE) directory, exactly matches the image above when using plot_point_obs directly.