Session 3
Session 3In this session you will:
- Customize the Unified Post Processor (UPP) output by adding/removing fields/levels in the GRIB2 SRW App output files
- Change a physics scheme in an existing Suite Definition File (SDF)
1. Customizing Unified Post Processor (UPP) Output
1. Customizing Unified Post Processor (UPP) OutputThe following set of instructions will guide you through how to customize the UPP configuration file to add/remove fields/levels in the Grib2 output for SRW v1.0.1. This requires a pre-processing step to create the flat text configuration file that UPP reads. This guide assumes you have already completed Session 1: Setup and Run the Workflow.
- Set environment variables as was done in Session 1:
SCRATCH_DIR=/glade/scratch/$USER
SR_WX_APP_TOP_DIR=$SCRATCH_DIR/ufs-srweather-app
EXPT_SUBDIR=test_CONUS_25km_GFSv15p2
EXPTDIR=${SR_WX_APP_TOP_DIR}/../expt_dirs/${EXPT_SUBDIR} - Move to the directory that contains the configuration files and scripts used for creating a custom flat text file read by UPP.
cd ${SR_WX_APP_TOP_DIR}/src/EMC_post/parm - Create a copy of the original fv3lam.xml file that will be modified so you do not overwrite the original. This is the file that lists all variables you would like to output.
cp fv3lam.xml fv3lam.xml.${USER}For a complete list of fields that can be output by UPP, please refer to the UPP Grib2 table in the online documentation. (Please note that some fields can only be output using certain models and/or physics options.)
- Example 1: Adding a simple field
This example describes how to add the field POT (potential temperature) on pressure levels to the fv3lam.xml.${USER} configuration file. This configuration file is split into two sections; BGDAWP and BGRD3D. Edit the configuration file by adding the following parameter to the BGRD3D section (search BGRD3D), but before the </paramset> tag at the bottom of the file.<param>
<shortname>POT_ON_ISOBARIC_SFC</shortname>
<pname>POT</pname>
<level>25000. 50000. 70000. 85000.</level>
<scale>4.0</scale>
</param>You may also delete an unwanted field by completely removing the parameter block of that field from the XML file and then continuing with step 7.
* Formatting is important; use other entries in the file as a guide.
** Adding fields requires knowledge on which fields can be output for your specific dynamic core and physics options. Not all fields available in UPP can be output with the UFS SRW application.
- Example 2: Adding levels to a field
This example will describe how to add levels to a field in the fv3lam.xml.${USER} configuration file. Edit the configuration file by adding the bold highlighted levels (in geopotential meters) to the field ‘Specific humidity on flight levels’.<param>
<shortname>SPFH_ON_SPEC_HGT_LVL_ABOVE_GRND_FDHGT</shortname>
<level>20. 30. 40. 50. 80. 100. 305. 610. 1524.</level>
<scale>4.0</scale>
</param>For the list of available levels for each level type, please reference the UPP documentation on ‘Controlling which levels UPP outputs’. You may also easily remove levels from the tag by simply deleting them from the list.
- Example 3: Adding a satellite brightness temperature field
This example describes how to add the field SBTA169 (GOES-16 Channel 9; IR mid-level troposphere water vapor) to the fv3lam.xml.${USER} configuration file. (Note that while other channels are available for GOES-16, we are only adding this one).
Edit the configuration file by adding the following parameter to the BGDAWP section, but before the </paramset> tag (~L1820 of the original file).<param>
<shortname>SBTA169_ON_TOP_OF_ATMOS</shortname>
<scale>4.0</scale>
</param>In order to output a satellite brightness temperature field, the CRTM coefficient files for each of the satellites are needed. Move to the top level UPP directory, pull the CRTM fix tar file, and unpack.
cd ${SR_WX_APP_TOP_DIR}/src/EMC_post/
mkdir crtm && cd crtm
wget https://github.com/NOAA-EMC/EMC_post/releases/download/upp_v9.0.0/fix.tar.gz
tar -xzf fix.tar.gzThese coefficient files need to be copied to the UPP working directory and to do so requires modification of the UPP run script. Edit the file ${SR_WX_APP_TOP_DIR}/regional_workflow/scripts/exregional_run_post.sh to add the following lines in the same location where other files are being copied to the UPP run directory (~L189).
# Copy coefficients for crtm2 (simulated synthetic satellites)
cp_vrfy ${EMC_POST_DIR}/crtm/fix/EmisCoeff/IR_Water/Big_Endian/Nalli.IRwater.EmisCoeff.bin ./
cp_vrfy ${EMC_POST_DIR}/crtm/fix/EmisCoeff/MW_Water/Big_Endian/FAST*.bin ./
cp_vrfy ${EMC_POST_DIR}/crtm/fix/EmisCoeff/IR_Land/SEcategory/Big_Endian/NPOESS.IRland.EmisCoeff.bin ./
cp_vrfy ${EMC_POST_DIR}/crtm/fix/EmisCoeff/IR_Snow/SEcategory/Big_Endian/NPOESS.IRsnow.EmisCoeff.bin ./
cp_vrfy ${EMC_POST_DIR}/crtm/fix/EmisCoeff/IR_Ice/SEcategory/Big_Endian/NPOESS.IRice.EmisCoeff.bin ./
cp_vrfy ${EMC_POST_DIR}/crtm/fix/AerosolCoeff/Big_Endian/AerosolCoeff.bin ./
cp_vrfy ${EMC_POST_DIR}/crtm/fix/CloudCoeff/Big_Endian/CloudCoeff.bin ./
cp_vrfy ${EMC_POST_DIR}/crtm/fix/SpcCoeff/Big_Endian/*.bin ./
cp_vrfy ${EMC_POST_DIR}/crtm/fix/TauCoeff/ODPS/Big_Endian/*.bin ./ - In order to ensure there are no errors in your modified fv3lam.xml.${USER} file, you may validate it against the XML stylesheets provided in the UPP parm directory.
cd ${SR_WX_APP_TOP_DIR}/src/EMC_post/parm
xmllint --noout --schema EMC_POST_CTRL_Schema.xsd fv3lam.xml.${USER}If the XML is error free, then the command will return that the XML validates. (e.g. fv3lam.xml.${USER} validates)
- Create the flat text file.
Note: The following is a one-line command./usr/bin/perl PostXMLPreprocessor.pl fv3lam.xml.${USER} fv3lam_post_avblflds.xml postxconfig-NT-fv3lam.txt.${USER}The perl program PostXMLPreprocessor.pl processes the modified xml and creates the flat text configuration file with the file name provided. In this case the new flat text file is postxconfig-NT-fv3lam.txt.${USER} and should now exist in the parm directory if this step was successful.
- To run the SRW post-processing with this new customized flat text file for the experiment from session 1, move back to the directory with the workflow configuration file.
cd ${SR_WX_APP_TOP_DIR}/regional_workflow/ushCopy the config file from session 1 back to config.sh.
cp config.sh.session_1 config.shThen modify the config.sh, adding the following lines:
USE_CUSTOM_POST_CONFIG_FILE="TRUE"
CUSTOM_POST_CONFIG_FP="/glade/scratch/${USER}/ufs-srweather-app/src/EMC_post/parm/postxconfig-NT-fv3lam.txt.${USER}"Setting the USE_CUSTOM_POST_CONFIG_FILE to TRUE tells the workflow to use the custom file located in the user-defined path, CUSTOM_POST_CONFIG_FP. The path should include the filename. If this is set to true and the file path is not found, then an error will occur when trying to generate the SRW Application workflow using the generate_FV3LAM_wflow.sh script.
- You can then proceed with running the workflow using the modified configuration file.
Load the Python environment and generate the FV3LAM workflow.
source ${SR_WX_APP_TOP_DIR}/env/wflow_cheyenne.env
./generate_FV3LAM_wflow.shStart the entire case workflow following the instructions from Session 1: Step 4. Run the Workflow and UPP will use the new flat postxconfig-NT-fv3lam.txt.${USER} file. Once the workflow is complete, the new UPP output should include the added fields and levels.
Optional Downstream Application examples for UPP output
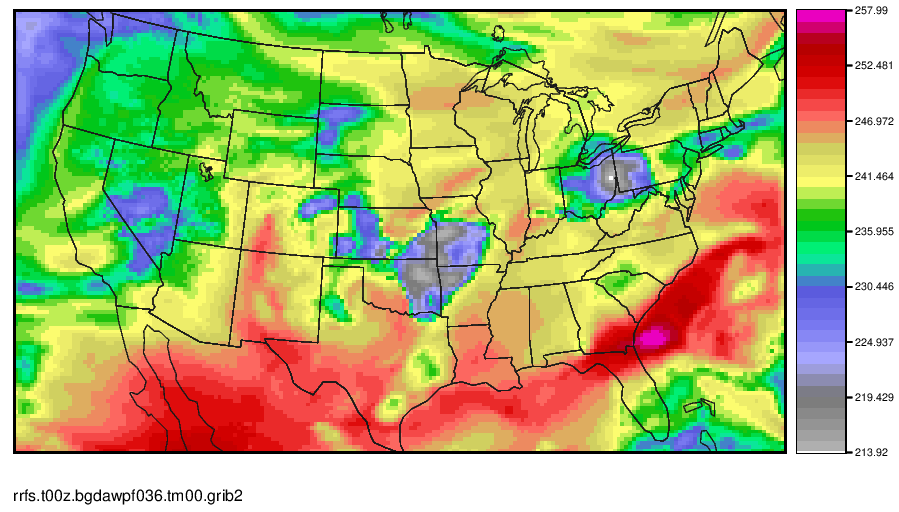
You can check the contents of the UPP output using a simple wgrib2 command. Move to the directory containing the UPP output.
Load the module for wgrib2 on Cheyenne and use it to list the fields within the Grib2 files.
wgrib2 rrfs.t00z.bgdawpf036.tm00.grib2
wgrib2 rrfs.t00z.bgrd3df036.tm00.grib2
Or for additional diagnostic output such as min/max values and grid specs:
wgrib2 -V rrfs.t00z.bgrd3df036.tm00.grib2
If you want to seach for a specific variable rather than printing out the entire list:
You can produce a simple plot of the GOES-16, channel 9 field that we added in step 6 using the Model Evaluation Tools (MET) plot_data_plane function.
Load METv10.0.0 via a module on Cheyenne.
module load met/10.0.0
In the postprd directory, use the plot_data_plane tool to create a postscript file.
gv SBTA169_2019061500_f036.ps
The GOES-16 Channel 9 (IR mid-level troposphere water vapor) image at F036 should look like this.
Regrid UPP output using wgrib2 and create a simple plot using MET. (Note that MET also has regrid capabilities; however, for those without the MET software, wgrib2 is a great tool)
UPP grib2 output is on the same grid as the model output, which for this SRW case is a 25 km Lambert Conformal grid. This example shows how to transform to a lat-lon grid. The specifications for a simple lat-lon projection are:
| Variable | Description |
|---|---|
| lon0/lat0 | Longitude/Latitude of first grid point in degrees |
| nlon/nlat | Number of Longitudes/Latitudes |
| dlon/dlat | Grid resolution in degrees of Longitude/Latitude |
Example:
This will interpolate to a 0.125 degree latitude-longitude grid with earth-relative winds (U-wind goes east, V-wind goes north), zoomed in on the region of active convection.
Make a quick plot of GOES-16 Channel 9 from the newly regrid data using MET.
gv SBTA169_2019061500_f036_regrid.ps
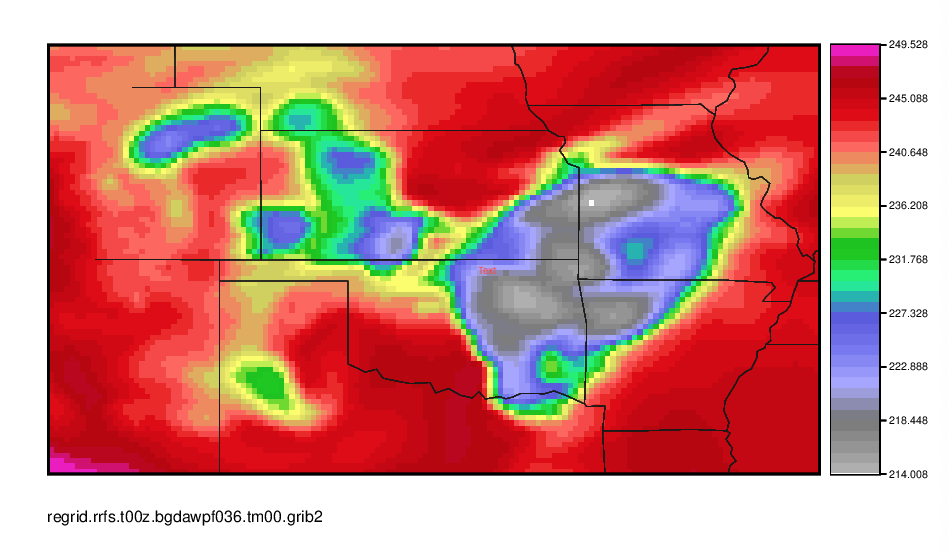
You can also view the contents of the new file with wgrib2 as before.
For more wgrib2 options/examples, you can refer to the wgrib2 site.
For more information on MET/METplus, refer to the MET Users Page/METplus Users Page.
2. Changing a Physics Scheme in the Suite Definition File (SDF)
2. Changing a Physics Scheme in the Suite Definition File (SDF)The following set of instructions will guide you through the process of changing the land surface model from Noah to NoahMP in the suite GFSv15p2.
- Go to the suite definition file directory:
The physics schemes for the GFSv15p2 suite are defined in the suite definition file suite_FV3_GFS_v15p2.xml under the directory: /glade/scratch/$USER/ufs-srweather-app/src/ufs_weather_model/FV3/ccpp/suites
Change to the suite directory and check the suite files:cd /glade/scratch/$USER/ufs-srweather-app/src/ufs_weather_model/FV3/ccpp/suites
ls -1suite_FV3_GFS_v15p2.xml
suite_FV3_RRFS_v1alpha.xml
suite.xsdThe suite definition file is a text file, and a modified suite can be constructed from the existing SDF. A modified suite can be constructed from an existing SDF through copying the existing suite file and changing other aspects of the file.
cp suite_FV3_GFS_v15p2.xml suite_FV3_GFS_v15p2_noahmp.xml - Modify the GFSv15p2_noahmp SDF file with a new land surface model(LSM):
- To change the Noah land surface model (lsm_noah) to noah_mp land surface model (noahmpdrv) in suite_FV3_GFS_v15p2_noahmp.xml, change:
<scheme>lsm_noah</scheme>to
<scheme>noahmpdrv</scheme> - Change the suite name in the file from:
<suite name="FV3_GFS_v15p2" lib="ccppphys" ver="5">to
<suite name="FV3_GFS_v15p2_noahmp" lib="ccppphys" ver="5">
- To change the Noah land surface model (lsm_noah) to noah_mp land surface model (noahmpdrv) in suite_FV3_GFS_v15p2_noahmp.xml, change:
- Add the new suite to the compiling command:
Edit the file /glade/scratch/$USER/ufs-srweather-app/src/CMakeLists.txt by changing:set(CCPP_SUITES "FV3_GFS_v15p2,FV3_RRFS_v1alpha")to
set(CCPP_SUITES "FV3_GFS_v15p2,FV3_GFS_v15p2_noahmp,FV3_RRFS_v1alpha")so the new suite is included in the compiling of the model.
- Modify the Workflow to include the new suite:
- Add suite FV3_GFS_v15p2_noahmp to the file FV3.input.yml under the directory /glade/scratch/$USER/ufs-srweather-app/regional_workflow/ush/templates. Insert the following part after line 272 in FV3.input.yml:
FV3_GFS_v15p2_noahmp:
atmos_model_nml:
fdiag: 1
fms_nml:
domains_stack_size: 1800200
fv_core_nml:
<<: *gfs_v15_fv_core
agrid_vel_rst: False
d2_bg_k1: 0.15
d2_bg_k2: 0.02
dnats: 1
do_sat_adj: True
fv_debug: False
fv_sg_adj: 600
k_split: 1
kord_mt: 9
kord_tm: -9
kord_tr: 9
kord_wz: 9
n_split: 8
n_sponge: 30
nord_zs_filter: !!python/none
nudge_qv: True
range_warn: False
rf_cutoff: 750.0
rf_fast: False
gfdl_cloud_microphysics_nml:
<<: *gfs_gfdl_cloud_mp
sedi_transport: True
tau_l2v: 225.0
tau_v2l: 150.0
gfs_physics_nml:
<<: *gfs_v15_gfs_physics
bl_mynn_edmf: !!python/none
bl_mynn_edmf_mom: !!python/none
bl_mynn_tkeadvect: !!python/none
cnvcld: True
cnvgwd: True
cplflx: !!python/none
do_myjpbl: False
do_myjsfc: False
do_mynnedmf: !!python/none
do_mynnsfclay: !!python/none
do_tofd: False
do_ugwp: False
do_ysu: False
fhcyc: 0.0
fhlwr: 3600.0
fhswr: 3600.0
fhzero: 6.0
hybedmf: True
iau_delthrs: !!python/none
iaufhrs: !!python/none
imfdeepcnv: 2
imfshalcnv: 2
imp_physics: 11
icloud_bl: !!python/none
iopt_alb: 2
iopt_btr: 1
iopt_crs: 1
iopt_dveg: 2
iopt_frz: 1
iopt_inf: 1
iopt_rad: 1
iopt_run: 1
iopt_sfc: 1
iopt_snf: 4
iopt_stc: 1
iopt_tbot: 2
ldiag_ugwp: False
lgfdlmprad: True
lradar: !!python/none
lsm: 2
lsoil: !!python/none
lsoil_lsm: !!python/none
ltaerosol: !!python/none
shal_cnv: True
shinhong: False
ttendlim: !!python/none
xkzm_h: 1.0
xkzm_m: 1.0
xkzminv: 0.3
namsfc:
landice: True
ldebug: False
surf_map_nml:It’s similar to the setting for suite FV3_GFS_v15p2 except the lsm=2.
- Prepare tables for noahmp:
cp field_table.FV3_GFS_v15p2 field_table.FV3_GFS_v15p2_noahmp
cp diag_table.FV3_GFS_v15p2 diag_table.FV3_GFS_v15p2_noahmp - Add suite FV3_GFS_v15p2_noahmp to valid_param_vals.sh under /glade/scratch/$USER/ufs-srweather-app/regional_workflow/ush, by changing:
valid_vals_CCPP_PHYS_SUITE=( \
"FV3_GFS_v15p2" \
"FV3_RRFS_v1alpha" \
)to
valid_vals_CCPP_PHYS_SUITE=( \
"FV3_GFS_v15p2" \
"FV3_GFS_v15p2_noahmp" \
"FV3_RRFS_v1alpha" \
) - Add suite FV3_GFS_v15p2_noahmp to files exregional_make_ics.sh, and exregional_make_lbcs.sh under the directory /glade/scratch/$USER/ufs-srweather-app/regional_workflow/scripts:
cd /glade/scratch/$USER/ufs-srweather-app/regional_workflow/scriptsEdit files exregional_make_ics.sh, and exregional_make_lbcs.sh, changing all
[ "${CCPP_PHYS_SUITE}" = "FV3_GFS_v15p2" ] || \to
[ "${CCPP_PHYS_SUITE}" = "FV3_GFS_v15p2" ] || \
[ "${CCPP_PHYS_SUITE}" = "FV3_GFS_v15p2_noahmp" ] || \and changing
"FV3_GFS_v15p2" | "FV3_CPT_v0" )to
"FV3_GFS_v15p2_noahmp" | \
"FV3_GFS_v15p2" | "FV3_CPT_v0" )To confirm the changes, run:
less *.sh | grep v15to get the following messages to make sure the suite is added correctly:
"FV3_GFS_v15p2_noahmp" | \
"FV3_GFS_v15p2" | "FV3_CPT_v0" )
[ "${CCPP_PHYS_SUITE}" = "FV3_GFS_v15p2" ] || \
[ "${CCPP_PHYS_SUITE}" = "FV3_GFS_v15p2_noahmp" ] || \
[ "${CCPP_PHYS_SUITE}" = "FV3_GFS_v15p2" ] || \
[ "${CCPP_PHYS_SUITE}" = "FV3_GFS_v15p2_noahmp" ] || \
[ "${CCPP_PHYS_SUITE}" = "FV3_GFS_v15p2" ] || \
[ "${CCPP_PHYS_SUITE}" = "FV3_GFS_v15p2_noahmp" ] || \
[ "${CCPP_PHYS_SUITE}" = "FV3_GFS_v15p2" ] || \
[ "${CCPP_PHYS_SUITE}" = "FV3_GFS_v15p2_noahmp" ] || \
[ "${CCPP_PHYS_SUITE}" = "FV3_GFS_v15p2" ] || \
[ "${CCPP_PHYS_SUITE}" = "FV3_GFS_v15p2_noahmp" ] || \
"FV3_GFS_v15p2_noahmp" | \
"FV3_GFS_v15p2" | "FV3_CPT_v0" )
[ "${CCPP_PHYS_SUITE}" = "FV3_GFS_v15p2" ] || \
[ "${CCPP_PHYS_SUITE}" = "FV3_GFS_v15p2_noahmp" ] || \
[ "${CCPP_PHYS_SUITE}" = "FV3_GFS_v15p2" ] || \
[ "${CCPP_PHYS_SUITE}" = "FV3_GFS_v15p2_noahmp" ] || \
[ "${CCPP_PHYS_SUITE}" = "FV3_GFS_v15p2" ] || \
[ "${CCPP_PHYS_SUITE}" = "FV3_GFS_v15p2_noahmp" ] || \
- Add suite FV3_GFS_v15p2_noahmp to the file FV3.input.yml under the directory /glade/scratch/$USER/ufs-srweather-app/regional_workflow/ush/templates. Insert the following part after line 272 in FV3.input.yml:
- Compile the model with the new suite:
Users can refer to Session 1 for additional information:cd /glade/scratch/$USER/ufs-srweather-app/
source env/build_cheyenne_intel.env -
mkdir build
cd buildRun cmake to set up the Makefile, then run make:
cmake .. -DCMAKE_INSTALL_PREFIX=..
make -j 4 >& build.out & - Set the config.sh file:
Go to the the ush directorycd /glade/scratch/$USER/ufs-srweather-app/regional_workflow/ush/Use the config.sh from Session 1 and edit the config.sh, making sure the machine and account are set correctly:
MACHINE="cheyenne"
ACCOUNT="NJNT0008"- Change the name of the experiment directory (which is also the name of the experiment) to something that properly represents the new settings:
EXPT_SUBDIR="test_CONUS_25km_GFSv15p2_noahmp" - Set the predefined grid to the CONUS grid with 25km resolution:
PREDEF_GRID_NAME="RRFS_CONUS_25km" - Change the forecast length to 6 hours:
FCST_LEN_HRS="6"Only a 6 hour forecast is used for practice purposes.
- Set the suite:
CCPP_PHYS_SUITE="FV3_GFS_v15p2_noahmp" - Make sure the LBCS and ICS directories are set correctly:
USE_USER_STAGED_EXTRN_FILES="TRUE"
EXTRN_MDL_SOURCE_BASEDIR_ICS="/glade/p/ral/jntp/UFS_SRW_app/staged_extrn_mdl_files/FV3GFS"
EXTRN_MDL_SOURCE_BASEDIR_LBCS="/glade/p/ral/jntp/UFS_SRW_app/staged_extrn_mdl_files/FV3GFS"
- Change the name of the experiment directory (which is also the name of the experiment) to something that properly represents the new settings:
- Generate the workflow with the modified suite file:
Load the appropriate Python environment for Cheyenne:source ../../env/wflow_cheyenne.envGenerate the workflow with the command:
./generate_FV3LAM_wflow.sh - Run the workflow:
- Run the model manually:
cd /glade/scratch/$USER/expt_dirs/test_CONUS_25km_GFSv15p2_noahmp
./launch_FV3LAM_wflow.shThis command needs to be repeated until all the jobs are finished.
- Run the model through the crontab:
For automatic resubmission of the workflow (e.g., every 3 minutes), the following line can be added to the user’s crontab:crontab -eand insert the line:
*/3 * * * * cd /glade/scratch/$USER/expt_dirs/test_CONUS_25km_GFSv15p2_noahmp && ./launch_FV3LAM_wflow.sh
- Run the model manually:
- Check the model running status:
rocotostat -w FV3LAM_wflow.xml -d FV3LAM_wflow.db -v 10The workflow run is completed when all tasks have “SUCCEEDED”
- Generate the plots:
- Change to the python script directory:
cd /glade/scratch/$USER/ufs-srweather-app/regional_workflow/ush/Python - Load the appropriate Python environment for Cheyenne:
module purge
module load ncarenv
ncar_pylib /glade/p/ral/jntp/UFS_SRW_app/ncar_pylib/python_graphicsIf you see something like:
Warning: library /glade/p/ral/jntp/UFS_SRW_app/ncar_pylib/regional_workflow is missing from NPL clone registry.
Do you wish to add it to the registry (y/N)?This will occur if this is the first time you have used the NCAR Python Library (NPL), type ‘y’, to get the following output:
Searching library for configuration info ...
Now using NPL virtual environment at path:
/glade/p/ral/jntp/UFS_SRW_app/ncar_pylib/regional_workflow
Use deactivate to remove NPL from environment - Run the python plotting script:
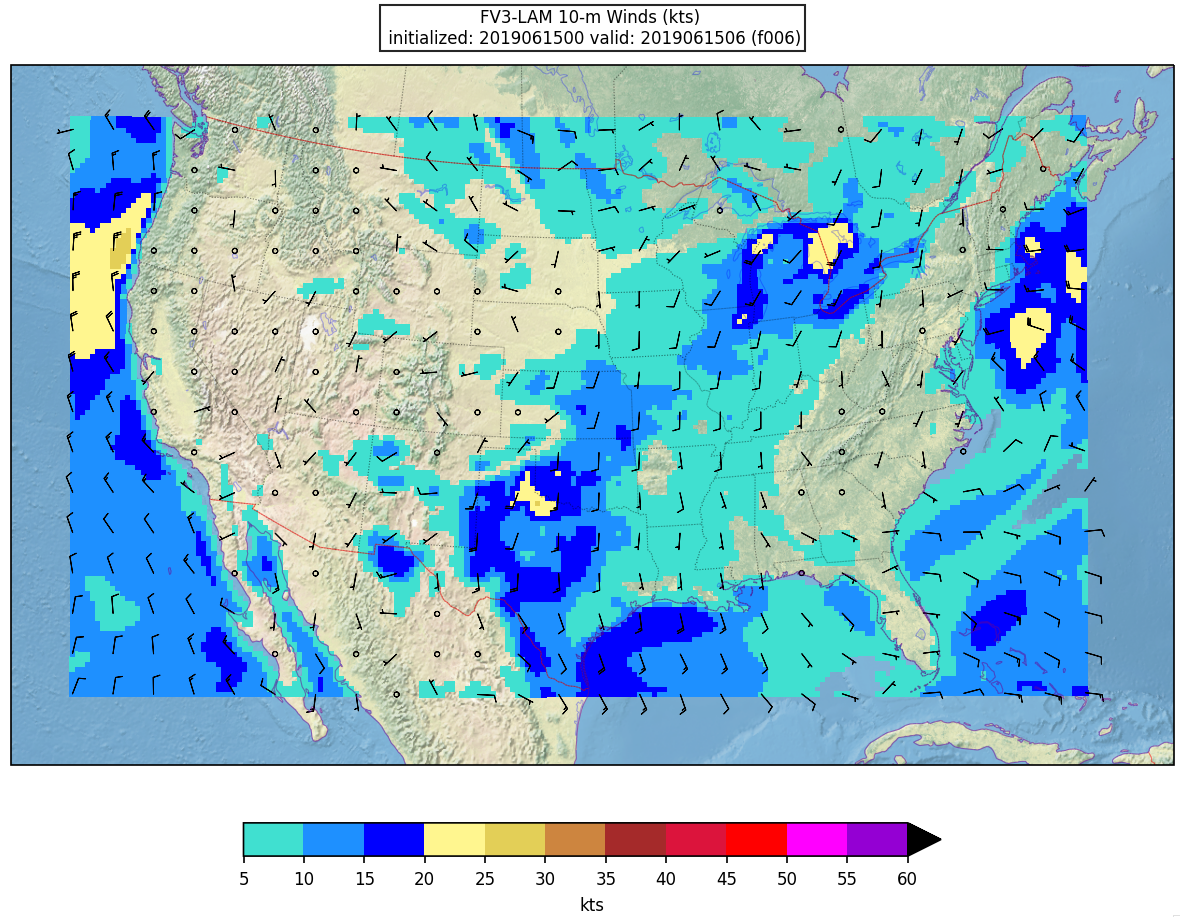
Note: The following is a one-line command:python plot_allvars.py 2019061500 6 6 6 /glade/scratch/$USER/expt_dirs/test_CONUS_25km_GFSv15p2_noahmp /glade/p/ral/jntp/UFS_SRW_app/tools/NaturalEarth - Display the output figures:
The output files (in .png format) can be found in the directory /glade/scratch/$USER/expt_dirs/test_CONUS_25km_GFSv15p2_noahmp/2019061500/postprdcd /glade/scratch/$USER/expt_dirs/test_CONUS_25km_GFSv15p2_noahmp/2019061500/postprd
display 10mwind_conus_f006.png
- Change to the python script directory: