Session 1
Session 1Setup and Run the Workflow
This session will enable you to run a two-day simulation with significant severe weather across the Contiguous United States (CONUS) from 15-16 June 2019. This test case uses FV3GFS initial and lateral boundary conditions in GRIB2 format. The simulation is configured for the predefined RRFS CONUS grid with 25 km resolution, and the FV3_GFS_v15p2 CCPP physics suite. The code base includes the UFS Weather Model, with pre- and post-processing, running with the regional workflow. In order to perform the test case, you will run the Short-Range Weather Application for 48 hours.
0. Log In To Cheyenne
0. Log In To CheyenneFrom a terminal:
And follow the instructions you received (Yubikey, Duo, other) to authenticate and complete the login.
* Welcome to Cheyenne - June 15,2021
******************************************************************************
Today in the Daily Bulletin (dailyb.cisl.ucar.edu)
- Opportunity for university researchers on NCAR’s Derecho supercomputer
- Where to run small jobs that only use CPUs
HPSS Update: 108 days until HPSS will be decommissioned.
Quick Start: www2.cisl.ucar.edu/resources/cheyenne/quick-start-cheyenne
User environment: www2.cisl.ucar.edu/resources/cheyenne/user-environment
Key module commands: module list, module avail, module spider, module help
CISL Help: support.ucar.edu -- 303-497-2400
--------------------------------------------------------------------------------
my_var="hello"
while in csh/tcsh, we use
set my_var="hello"
For convenience, set some environment variables to more easily navigate in your work space on Cheyenne. In this tutorial, we will use /glade/scratch:
SR_WX_APP_TOP_DIR=$SCRATCH_DIR/ufs-srweather-app
where $USER is your login/username, and $SR_WX_APP_TOP_DIR is the path in which you will clone the GitHub repository in the next step. Go to your work space on Cheyenne:
1. Clone the Code
1. Clone the CodeEstimated time: 5 minutes
The necessary source code is publicly available on GitHub. To clone the ufs-v1.0.1 branch of the ufs-srweather-app repository:
cd ufs-srweather-app
For convenience, set:
The UFS SRW App uses components from multiple repositories, including: the regional workflow, the UFS_UTILS pre-processor utilities, the UFS Weather Model, and the Unified Post Processor (UPP). Obtaining the necessary external repositories is simplified by the use of manage_externals:
The checkout_externals script uses the configuration file Externals.cfg in the top level directory and will clone the regional workflow, pre-processing utilities, UFS Weather Model, and UPP source code into the appropriate directories under your regional_workflow and src directories. The process will take several minutes and show the following progress information on the screen:
Checking status of externals: regional_workflow, ufs-weather-model, ufs_utils, emc_post,
Checking out externals: regional_workflow, ufs-weather-model, ufs_utils, emc_post,
Once the externals have been downloaded, you can proceed to the next step, building the executables.
2. Build the Executables
2. Build the ExecutablesEstimated time: 20-25 minutes
Instructions for loading the proper modules and/or setting the correct environment variables can be found in the env/ directory in files named build_<platform>_<compiler>.env. The commands in these files can be directly copy-pasted to the command line or the file can be sourced.
cp build_cheyenne_intel.env build_cheyenne_intel_tcsh.env
Make the following changes to build_cheyenne_intel_tcsh.env. Change
export CMAKE_CXX_COMPILER=mpicxx
export CMAKE_Fortran_COMPILER=mpif90
export CMAKE_Platform=cheyenne.intel
to
setenv CMAKE_CXX_COMPILERmpicxx
setenv CMAKE_Fortran_COMPILER mpif90
setenv CMAKE_Platform cheyenne.intel
The modified script can then be sourced as follows:
source ./env/build_cheyenne_intel_tcsh.env
to set the build environment.
Build the executables as follows (for both bash and csh/tcsh users):
cd build
Run cmake to set up the Makefile, then run make:
make -j 4 >& build.out &
Output from the build will be in the $SR_WX_APP_TOP_DIR/build/build.out file. When the build completes, you should see the forecast model executable NEMS.exe and eleven pre- and post-processing executables in the $SR_WX_APP_TOP_DIR/bin directory.
3. Generate the Workflow Experiment
3. Generate the Workflow ExperimentEstimated time: 15 minutes
Generating the workflow requires three steps:
- Set experiment parameters in config.sh
- Set Python and other environment parameters
- Run the generate_FV3LAM_wflow.sh script
The workflow requires a file called config.sh to specify the values of your experiment parameters. Make a copy of the example template config.community.sh file provided in the $SR_WX_APP_TOP_DIR/regional_workflow/ush directory (from the build directory):
cp config.community.sh config.sh
Edit the config.sh file on Cheyenne for running the FV3_GFS_v15p2 physics suite for 48 hours starting at 00 UTC on 15 June 2019 on a 25 km predefined CONUS domain. Since this is the default case, only the following variables need to be modified in config.sh:
ACCOUNT="NJNT0008"
USE_USER_STAGED_EXTRN_FILES="TRUE"
EXTRN_MDL_SOURCE_BASEDIR_ICS="/glade/p/ral/jntp/UFS_SRW_app/staged_extrn_mdl_files/FV3GFS"
EXTRN_MDL_SOURCE_BASEDIR_LBCS="/glade/p/ral/jntp/UFS_SRW_app/staged_extrn_mdl_files/FV3GFS"
where ACCOUNT is an account you can charge. We will be using pre-staged initialization data, so uncomment USE_USER_STAGED_EXTRN_FILES="TRUE".
EXTRN_MDL_SOURCE_BASEDIR_ICS and EXTRN_MDL_SOURCE_BASEDIR_LBCS contain the locations of the initial and lateral boundary conditions, and EXTRN_MDL_FILES_ICS and EXTRN_MDL_FILES_LBCS contain the filenames of the initial and lateral boundary conditions.
Load the appropriate Python environment for Cheyenne:
If you see something like:
Do you wish to add it to the registry (y/N)?
This will occur if this is the first time you have used the NCAR Python Library (NPL), type y, to get the following output:
Now using NPL virtual environment at path:
/glade/p/ral/jntp/UFS_SRW_app/ncar_pylib/regional_workflow
Use deactivate to remove NPL from environment
The workflow can be generated with the command:
The generated workflow will be located in ${SR_WX_APP_TOP_DIR}/../expt_dirs/${EXPT_SUBDIR} where ${SR_WX_APP_TOP_DIR} is the directory where the ufs-srweather-app was cloned in Step 1, and ${EXPT_SUBDIR} is the experiment name set above in the config.sh file: test_CONUS_25km_GFSv15p2
4. Run the Workflow
4. Run the WorkflowEstimated time: 25 min
Set the environment variable $EXPTDIR to your experiment directory to make navigation easier:
EXPTDIR=${SR_WX_APP_TOP_DIR}/../expt_dirs/${EXPT_SUBDIR}
The workflow can be run using the./launch_FV3LAM_wflow.sh script which contains the rocotorun and rocotostat commands needed to launch the tasks and monitor the progress. There are two ways to run the ./launch_FV3LAM_wflow.sh script: 1) manually from the command line or 2) by adding a command to the user’s crontab. Both options are described below.
To run the workflow manually:
./launch_FV3LAM_wflow.sh
Once the workflow is launched with the launch_FV3LAM_wflow.sh script, a log file named log.launch_FV3LAM_wflow will be created in $EXPTDIR.
To see what jobs are running for a given user at any given time, use the following command:
This will show any of the workflow jobs/tasks submitted by rocoto (in addition to any unrelated jobs the user may have running). Error messages for each task can be found in the task log files located in the $EXPTDIR/log directory. In order to launch more tasks in the workflow, you just need to call the launch script again in the $EXPTDIR directory as follows:
until all tasks have completed successfully. You can also look at the end of the $EXPT_DIR/log.launch_FV3LAM_wflow file to see the status of the workflow. When the workflow is complete, you no longer need to issue the ./launch_FV3LAM_wflow.sh command.
To run the workflow via crontab:
For automatic resubmission of the workflow (e.g., every 3 minutes), the following line can be added to the user’s crontab:
and insert the line:
The state of the workflow can be monitored using the rocotostat command, from the $EXPTDIR directory:
The workflow run is completed when all tasks have “SUCCEEDED”, and the rocotostat command will output the following:
=================================================================================
201906150000 make_grid 4953154 SUCCEEDED 0 1 5.0
201906150000 make_orog 4953176 SUCCEEDED 0 1 26.0
201906150000 make_sfc_climo 4953179 SUCCEEDED 0 1 33.0
201906150000 get_extrn_ics 4953155 SUCCEEDED 0 1 2.0
201906150000 get_extrn_lbcs. 4953156 SUCCEEDED 0 1 2.0
201906150000 make_ics 4953184 SUCCEEDED 0 1 16.0
201906150000 make_lbcs 4953185 SUCCEEDED 0 1 71.0
201906150000 run_fcst 4953196 SUCCEEDED 0 1 1035.0
201906150000 run_post_f000 4953244 SUCCEEDED 0 1 5.0
201906150000 run_post_f001 4953245 SUCCEEDED 0 1 4.0
...
201906150000 run_post_f048 4953381 SUCCEEDED 0 1 5.0
If something goes wrong with a workflow task, it may end up in the DEAD state:
=================================================================================
201906150000 make_grid 20754069 DEAD 256 1 11.0
This means that the DEAD task has not completed successfully, so the workflow has stopped. Go to the $EXPTDIR/log directory and look at the make_grid.log file, in this case, to identify the issue. Once the issue has been fixed, the failed task can be re-run using the rocotowind command:
rocotorewind -w FV3LAM_wflow.xml -d FV3LAM_wflow.db -v 10 -c 201906150000 -t make_grid
where -c specifies the cycle date (first column of rocotostat output) and -t represents the task name (second column of rocotostat output). After using rocotorewind, the next time rocotorun is used to advance the workflow, the job will be resubmitted.
5. Generate the Plots
5. Generate the PlotsThe plotting scripts are under the directory $SR_WX_APP_TOP_DIR/regional_workflow/ush/Python
Change to the script directory
Load the appropriate python environment for Cheyenne,
module load ncarenv
ncar_pylib /glade/p/ral/jntp/UFS_SRW_app/ncar_pylib/python_graphics
If you see something like:
Do you wish to add it to the registry (y/N)?
This will occur if this is the first time you have used the NCAR Python Library (NPL), type y, to get the following output:
Now using NPL virtual environment at path:
/glade/p/ral/jntp/UFS_SRW_app/ncar_pylib/regional_workflow
Use deactivate to remove NPL from environment
Run the python plotting script (Estimated time: 5 minutes)
Here plot_allvar.py is the plotting script, and six command line arguments are:
- 2019061500 is cycle date/time in YYYYMMDDHH format,
- 6 is the starting forecast hour
- 12 is the ending forecast hour
- 6 is the forecast hour increment
- The top level of the experiment directory is /glade/scratch/$USER/expt_dirs/test_CONUS_25km_GFSv15p2
- /glade/p/ral/jntp/UFS_SRW_app/tools/NaturalEarth is the base directory of the cartopy shapefiles
Display the output figures
The output files (in .png format) can be found in the directory /glade/scratch/$USER/expt_dirs/test_CONUS_25km_GFSv15p2/2019061500/postprd.
The png files can be found using ls command after changing to that directory:
ls *.png
10mwind_conus_f012.png 2mt_conus_f006.png qpf_conus_f012.png slp_conus_f006.png
250wind_conus_f006.png 2mt_conus_f012.png refc_conus_f006.png slp_conus_f012.png
250wind_conus_f012.png 500_conus_f006.png refc_conus_f012.png uh25_conus_f006.png
2mdew_conus_f006.png 500_conus_f012.png sfcape_conus_f006.png uh25_conus_f012.png
The png file can be displayed by the command display:
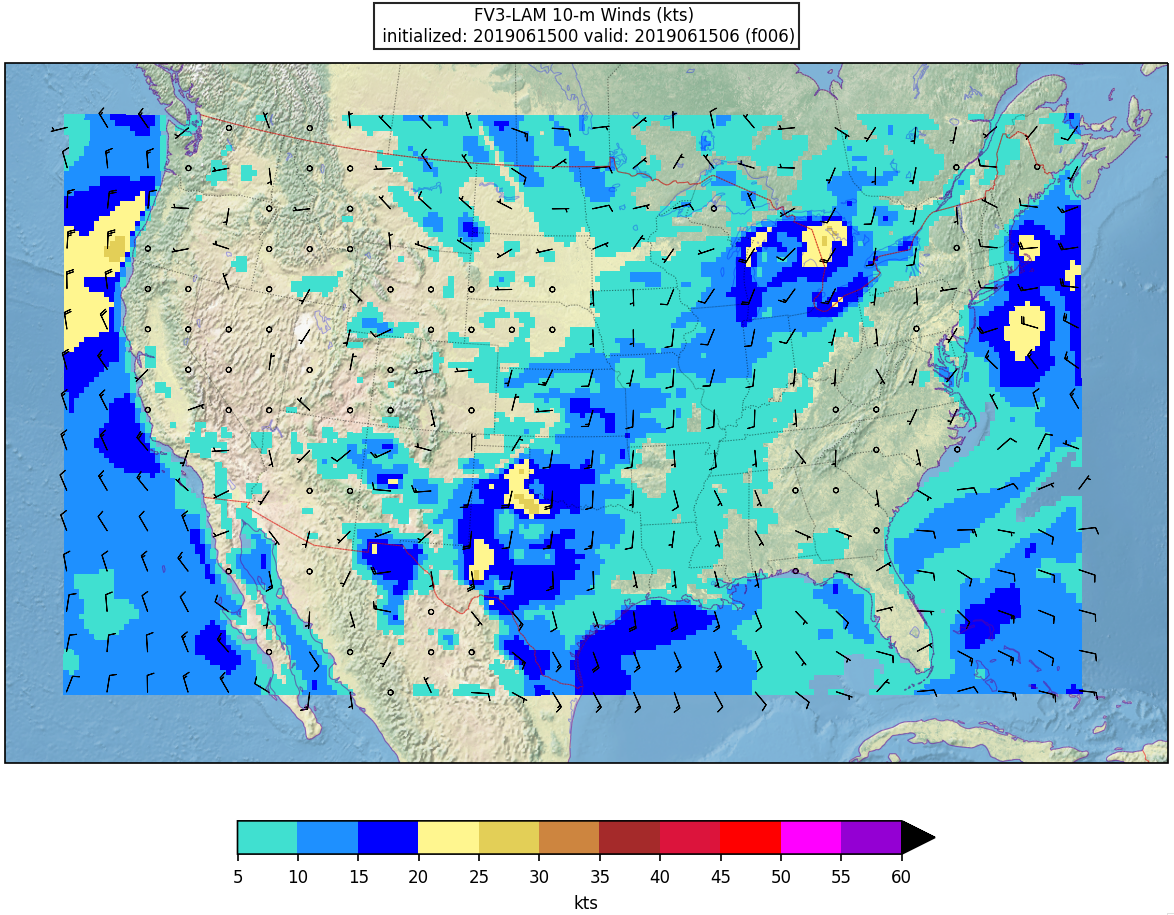
Here is an example plot of 10m surface wind at F006:
Running with batch script
(Estimated time: 25 min wall time for 48 forecast hours, every 3 hours)
There are some batch scripts under the same directory with the python scripts. If the batch script qsub_job.sh is being used to run the plotting script, multiple environment variables need to be set prior to submitting the script besides the python environment:
For bash:
export EXPTDIR=/glade/scratch/$USER/expt_dirs/test_CONUS_25km_GFSv15p2
For csh/tcsh:
setenv EXPTDIR /glade/scratch/$USER/expt_dirs/test_CONUS_25km_GFSv15p2
The HOMErrfs gives the location of regional workflow and EXPTDIR points to the experiment directory (test_CONUS_25km_GFSv15p2). In addition, the account to run the batch job in qsub_job.sh needs to be set. You might wish to change the FCST_INC in the batch script for different plotting frequency, and increase the walltime to 25 minutes (for 48 forecast hours, every 3 hours).
Then the batch job can be submitted by the following command:
qsub qsub_job.sh
The running log will be in the file $HOMErrfs/ush/Python/plot_allvars.out when the job completes.
The output files (in .png format) will be located in the same directory as the command line run: $EXPTDIR/2019061500/postprd