NWP components
NWP componentsThe following sections provide examples of different customizations for the NWP software components. These examples are not exhaustive and are provided to give guidance for some common ways these components are modified and customized for new cases.
Changing WRF Namelist
Changing WRF NamelistChanging namelist options in WRF
Perhaps you'd like to rerun WRF with a different namelist option by changing a physics scheme. In this case, you'll want to rerun the WRF and all downstream components (i.e., UPP, Python graphics, MET, and METviewer), but you may not need to rerun the WPS, GSI, or Real components. In this example, we will demonstrate how to modify and rerun a container by modifying the namelist.input without deleting local output from a previous run.
Go to the scripts directory for the desired case:
Edit the namelist.input to making your desired modifications. For this example, we will change mp_physics from 4 (WSM5) to 8 (Thompson). **More information on how to set up and run WRF can be found on the Users' Page: http://www2.mmm.ucar.edu/wrf/users/
mp_physics = 8,
Rerun the WRF container using the local changes made to the namelist.input file and modifying the local WRF output directory (note: you can rename wrfprd whatever you choose):
Select the appropriate container instructions for your system below:
-v ${PROJ_DIR}/container-dtc-nwp/components/scripts/common:/home/scripts/common \
-v ${PROJ_DIR}/container-dtc-nwp/components/scripts/sandy_20121027:/home/scripts/case \
-v ${CASE_DIR}/wpsprd:/home/wpsprd -v ${CASE_DIR}/gsiprd:/home/gsiprd -v ${CASE_DIR}/wrfprd_mp6:/home/wrfprd \
--name run-sandy-wrf dtcenter/wps_wrf:${PROJ_VERSION} /home/scripts/common/run_wrf.ksh
Modify model domain
Modify model domainModifying the WRF model domain
This example demonstrates how to modify the domain for the Sandy case, but these procedures can be used as guidance for any other case as well.
Changing the model domain requires modifying the WRF namelist.wps and namelist.input. For this example, let's say you want to make the original Sandy domain larger and shift it westward to include more land.
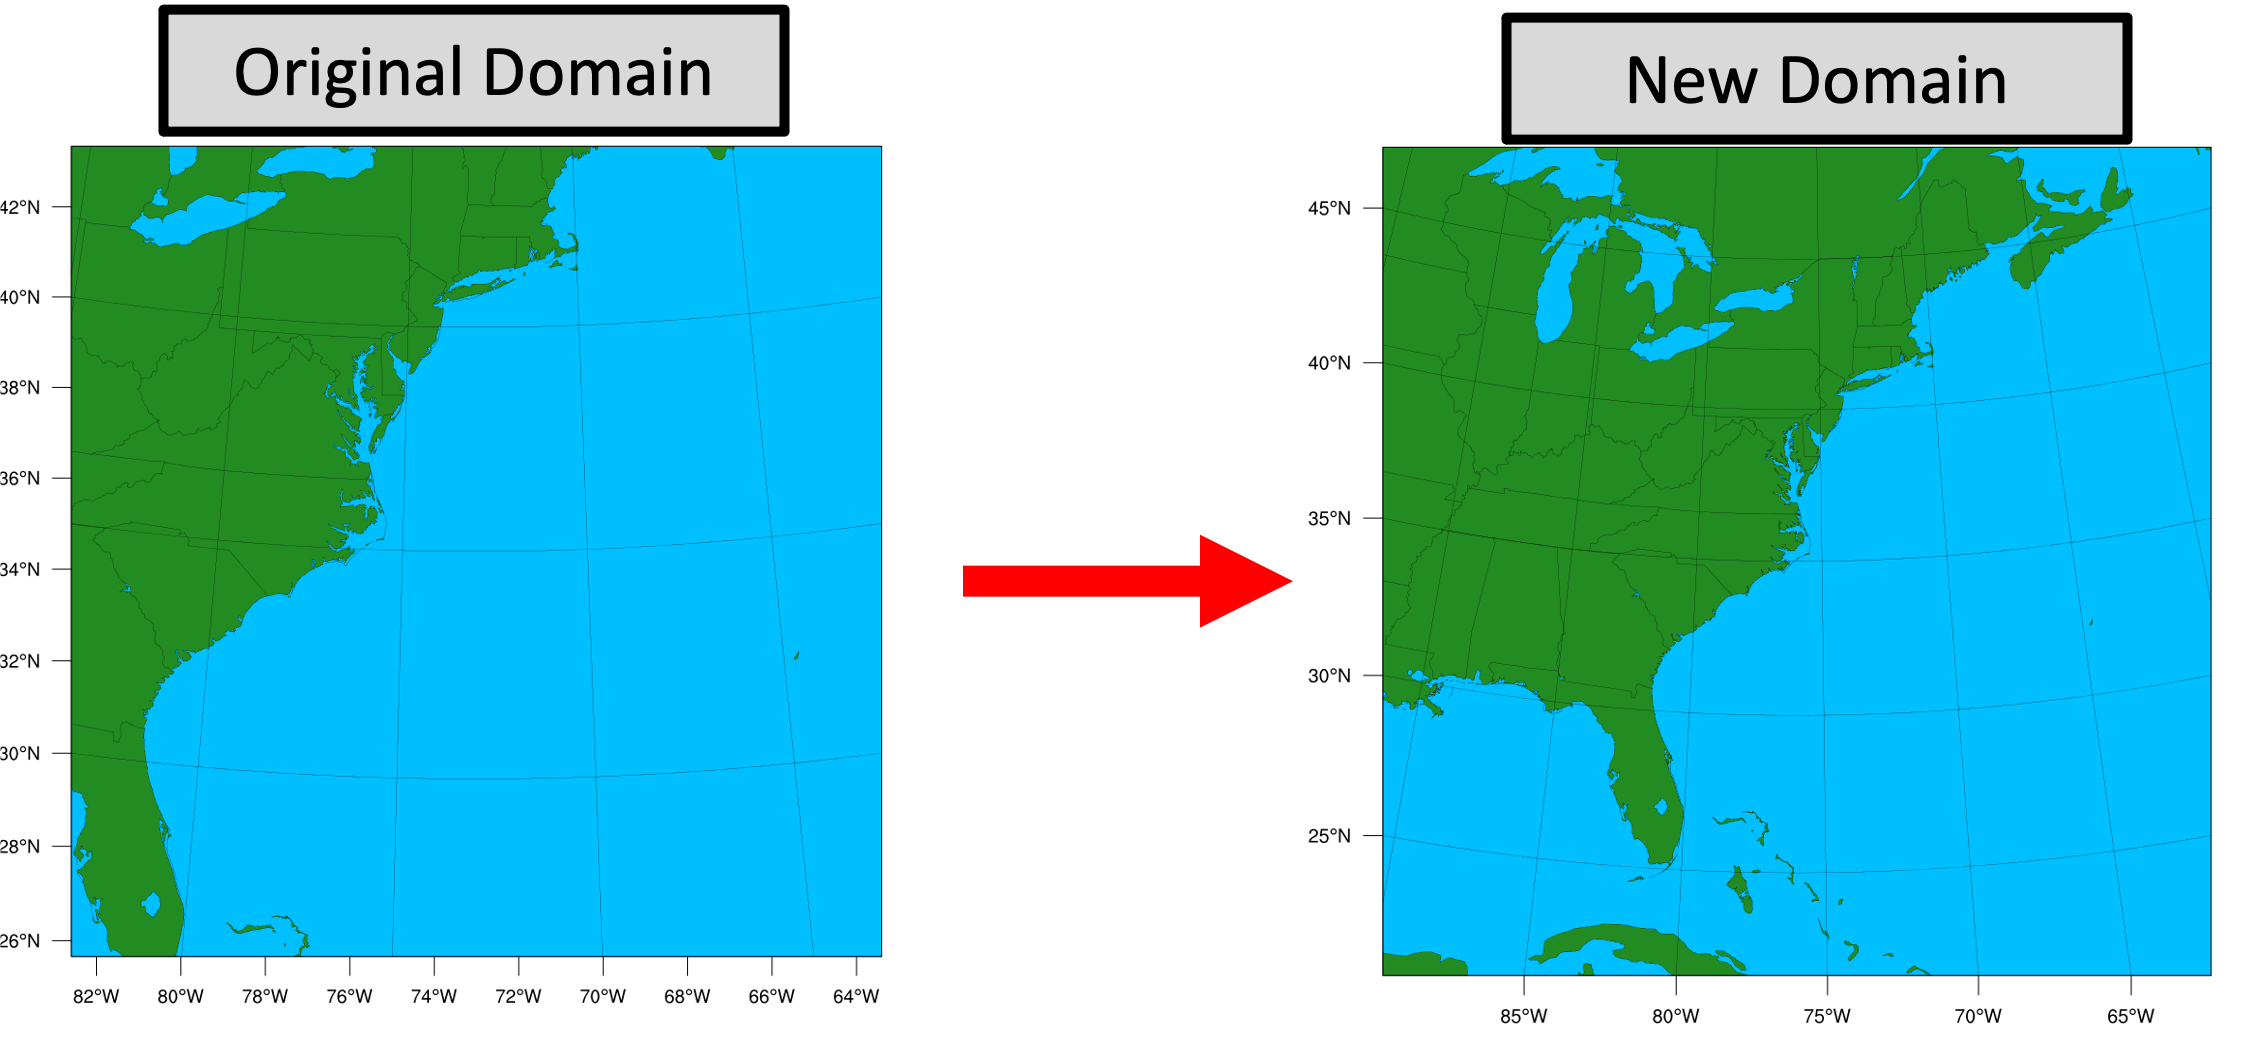
First, make sure you have created a new case directory so nothing is overwritten from the original run, and that your $CASE_DIR is properly set. See Setting Up a New Experiment
Next, modify the &geogrid section of the namelist.wps:
vi namelist.wps
Edits to &geogrid section of namelist.wps:
e_we: 50 --> 75 (line 15)
e_sn: 50 --> 75 (line 16)
ref_lon: -73. --> -76. (line 22)
stand_lon: -73.0 --> -76.0 (line 25)
The updated &geogrid section of the namelist.wps should look like this (with changes in bold):
parent_id = 1, 1,
parent_grid_ratio = 1, 3,
i_parent_start = 1, 31,
j_parent_start = 1, 17,
e_we = 75, 112,
e_sn = 75, 97,
geog_data_res = 'lowres', 'lowres',
dx = 40000,
dy = 40000,
map_proj = 'lambert',
ref_lat = 35.
ref_lon = -76.
truelat1 = 30.0,
truelat2 = 60.0,
stand_lon = -76.0,
geog_data_path = '/data/WPS_GEOG/',
opt_geogrid_tbl_path = '/comsoftware/wrf/WPS-4.1/geogrid',
/
The &domains section of the namelist.input file must also be updated to reflect these new domain parameters:
vi namelist.input
Edits to the &domains section of the namelist.input:
e_we: 50 --> 75 (line 38)
e_sn: 50 --> 75 (line 39)
time_step = 180,
time_step_fract_num = 0,
ime_step_fract_den = 1,
max_dom = 1,
e_we = 75, 112, 94,
e_sn = 75, 97, 91,
Now run the NWP components for your new case with the new domain.
SELECT THE APPROPRIATE CONTAINER INSTRUCTIONS FOR YOUR SYSTEM BELOW:
First run WPS:
Then run REAL:
Then run WRF:
-v ${PROJ_DIR}/container-dtc-nwp/components/scripts/common:/home/scripts/common \
-v ${PROJ_DIR}/container-dtc-nwp/components/scripts/sandy_20121027:/home/scripts/case \
-v ${CASE_DIR}/wpsprd:/home/wpsprd -v ${CASE_DIR}/gsiprd:/home/gsiprd -v ${CASE_DIR}/wrfprd:/home/wrfprd \
--name run-sandy-wrf dtcenter/wps_wrf:${PROJ_VERSION} /home/scripts/common/run_wrf.ksh
And continue running the remaining NWP components (i.e. UPP, MET, etc.)
First run WPS:
Then run REAL:
Then run WRF:
And continue running the remaining NWP components (i.e. UPP, MET, etc.)
Running WRF on multiple nodes with Singularity
Running WRF on multiple nodes with SingularityOne of the main advantages of Singularity is its broad support for HPC applications, specifically its lack of root privilege requirements and its support for scalable MPI on multi-node machines. This page will give an example of the procedure for running this tutorial's WPS/WRF Singularity container on multiple nodes on the NCAR Cheyenne supercomputer. The specifics of running on your particular machine of interest may be different, but you should be able to apply the lessons learned from this example to any HPC platform where Singularity is installed.
Step-by-step instructions
Load the singularity, gnu, and openmpi modules
module load gnu
module load openmpi
Set up experiment per usual (using snow case in this example)
git clone git@github.com:NCAR/container-dtc-nwp -b v${PROJ_VERSION}
mkdir data/ && cd data/
| tcsh | bash |
|---|---|
|
foreach f (/glade/p/ral/jntp/NWP_containers/*.tar.gz)
tar -xf "$f" end |
for f in /glade/p/ral/jntp/NWP_containers/*.tar.gz; do tar -xf "$f"; done
|
mkdir -p ${CASE_DIR} && cd ${CASE_DIR}
mkdir -p wpsprd wrfprd gsiprd postprd pythonprd metprd metviewer/mysql
export TMPDIR=${CASE_DIR}/tmp
mkdir -p ${TMPDIR}
Pull singularity image for wps_wrf from DockerHub
The Singularity containers used in this tutorial take advantage of the ability of the software to create Singularity containers from existing Docker images hosted on DockerHub. This allows the DTC team to support both of these technologies without the additional effort to maintain a separate set of Singularity recipe files. However, as mentioned on the WRF NWP Container page, the Docker containers in this tutorial contain some features (a so-called entrypoint script) to mitigate permissions issues seen with Docker on some platforms. Singularity on multi-node platforms does not work well with this entrypoint script, and because Singularity does not suffer from the same permissions issues as Docker, we have provided an alternate Docker container for use with Singularity to avoid these issues across multiple nodes:
Create a sandbox so the container is stored on disk rather than memory/temporary disk space
In the main tutorial, we create Singularity containers directly from the Singularity Image File (.sif). For multi-node Singularity, we will take advantage of an option known as "Sandbox" mode:
This creates a directory named "wps_wrf" that contains the entire directory structure of the singularity image; this is a way to interact with the Singularity container space from outside the container rather than having it locked away in the .sif file. You can use the ls command to view the contents of this directory, you will see it looks identical to the top-level directory structure of a typical linux install:
total 75
drwxr-xr-x 18 kavulich ral 4096 Feb 8 13:49 .
drwxrwxr-x 11 kavulich ral 4096 Feb 8 13:49 ..
-rw-r--r-- 1 kavulich ral 12114 Nov 12 2020 anaconda-post.log
lrwxrwxrwx 1 kavulich ral 7 Nov 12 2020 bin -> usr/bin
drwxr-xr-x 4 kavulich ral 4096 Feb 8 12:33 comsoftware
drwxr-xr-x 2 kavulich ral 4096 Feb 8 13:49 dev
lrwxrwxrwx 1 kavulich ral 36 Feb 8 13:42 environment -> .singularity.d/env/90-environment.sh
drwxr-xr-x 57 kavulich ral 16384 Feb 8 13:42 etc
lrwxrwxrwx 1 kavulich ral 27 Feb 8 13:42 .exec -> .singularity.d/actions/exec
drwxr-xr-x 4 kavulich ral 4096 Feb 8 12:52 home
lrwxrwxrwx 1 kavulich ral 7 Nov 12 2020 lib -> usr/lib
lrwxrwxrwx 1 kavulich ral 9 Nov 12 2020 lib64 -> usr/lib64
drwxr-xr-x 2 kavulich ral 4096 Apr 10 2018 media
drwxr-xr-x 2 kavulich ral 4096 Apr 10 2018 mnt
drwxr-xr-x 3 kavulich ral 4096 Dec 27 15:32 opt
drwxr-xr-x 2 kavulich ral 4096 Nov 12 2020 proc
dr-xr-x--- 5 kavulich ral 4096 Dec 27 16:00 root
drwxr-xr-x 13 kavulich ral 4096 Dec 27 16:20 run
lrwxrwxrwx 1 kavulich ral 26 Feb 8 13:42 .run -> .singularity.d/actions/run
lrwxrwxrwx 1 kavulich ral 8 Nov 12 2020 sbin -> usr/sbin
lrwxrwxrwx 1 kavulich ral 28 Feb 8 13:42 .shell -> .singularity.d/actions/shell
lrwxrwxrwx 1 kavulich ral 24 Feb 8 13:42 singularity -> .singularity.d/runscript
drwxr-xr-x 5 kavulich ral 4096 Feb 8 13:42 .singularity.d
drwxr-xr-x 2 kavulich ral 4096 Apr 10 2018 srv
drwxr-xr-x 2 kavulich ral 4096 Nov 12 2020 sys
lrwxrwxrwx 1 kavulich ral 27 Feb 8 13:42 .test -> .singularity.d/actions/test
drwxrwxrwt 7 kavulich ral 4096 Feb 8 12:53 tmp
drwxr-xr-x 13 kavulich ral 4096 Nov 12 2020 usr
drwxr-xr-x 18 kavulich ral 4096 Nov 12 2020 var
You can explore this directory to examine the contents of this container, but be cautious not to make any modifications that could cause problems later down the road!
Run WPS as usual
The command for running WPS is similar to that used in the main tutorial. Specifically, the fact that we are using a sandbox rather than creating a container straight from the singularity image file, requires a change to the run command. Note the bold part that is different from the original tutorial:
Prepare the wrfprd directory
Now this part is still a little hacky...but this will be cleaned up in future versions. Enter the wrfprd directory and manually link the met_em output files from WPS and rename them to the proper "nocolons" convention. Then, link in the contents of the WRF run directory containing the static input files and compiled executables from the container we created in a sandbox, and replace the default namelist with our case's custom namelist:
ln -sf ${CASE_DIR}/wps_wrf/comsoftware/wrf/WRF-4.3/run/* .
rm namelist.input
cp $PROJ_DIR/container-dtc-nwp/components/scripts/snow_20160123/namelist.input .
Finally, request as many cores/nodes as you want, reload the environment on compute nodes, and run!
qsub -V -I -l select=2:ncpus=36:mpiprocs=36 -q regular -l walltime=02:00:00 -A P48503002
ln -sf ${CASE_DIR}/wpsprd/met_em.* .
|
tcsh |
bash |
|---|---|
|
foreach f ( met_em.* )
setenv j `echo $f | sed s/\:/\_/g` mv $f $j end |
for f in met_em.*; do mv "$f" "$(echo "$f" | sed s/\:/\_/g)"; done
|
mpiexec -np 72 singularity run -u -B/glade:/glade ${CASE_DIR}/wps_wrf ./wrf.exe
The rest of the tutorial can be completed as normal.