Run NWP initialization components
Run NWP initialization componentsRun NWP Initialization Components
The NWP workflow process begins by creating the initial and boundary conditions for running the WRF model. This will be done in two steps using WPS (geogrid.exe, ungrib.exe, metgrid.exe) and WRF (real.exe) programs.
Initialization Data
Global Forecast System (GFS) forecast files initialized at 00 UTC on 20160123 out 24 hours in 3-hr increments are provided for this case.
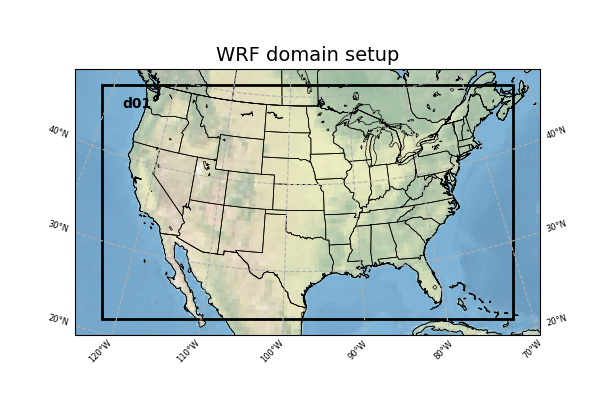
Model Domain
The WRF domain we have selected covers the contiguous United States. The exact domain is shown below:
SELECT THE APPROPRIATE CONTAINER INSTRUCTIONS FOR YOUR SYSTEM BELOW:
Step One (Optional): Run Python to Create Image of Domain
A Python script has been provided to plot the computational domain that is being run for this case. If desired, run the dtcenter/python container to execute Python in docker-space using the namelist.wps in the local scripts directory, mapping the output into the local pythonprd directory.
-v ${PROJ_DIR}/container-dtc-nwp/components/scripts/common:/home/scripts/common \
-v ${PROJ_DIR}/container-dtc-nwp/components/scripts/snow_20160123:/home/scripts/case \
-v ${PROJ_DIR}/data/shapefiles:/home/data/shapefiles \
-v ${CASE_DIR}/pythonprd:/home/pythonprd \
--name run-snow-python dtcenter/python:${PROJ_VERSION} \
/home/scripts/common/run_python_domain.ksh
A successful completion of the Python plotting script will result in the following file in the pythonprd directory. This is the same image that is shown at the top of the page showing the model domain.
Step Two: Run WPS
Using the previously downloaded data (in ${PROJ_DIR}/data), while pointing to the namelists in the local scripts directory, run the dtcenter/wps_wrf container to run WPS in docker-space and map the output into the local wpsprd directory.
-v ${PROJ_DIR}/data/WPS_GEOG:/data/WPS_GEOG -v ${PROJ_DIR}/data:/data \
-v ${PROJ_DIR}/container-dtc-nwp/components/scripts/common:/home/scripts/common \
-v ${CASE_DIR}/wrfprd:/home/wrfprd -v ${CASE_DIR}/wpsprd:/home/wpsprd \
-v ${PROJ_DIR}/container-dtc-nwp/components/scripts/snow_20160123:/home/scripts/case \
--name run-dtc-nwp-snow dtcenter/wps_wrf:${PROJ_VERSION} /home/scripts/common/run_wps.ksh
Once WPS begins running, you can watch the log files being generated in another window by setting the ${CASE_DIR} environment variable and tailing the log files:
Type CTRL-C to exit the tail utility.
A successful completion of the WPS steps will result in the following files (in addition to other files) in the wpsprd directory
FILE:2016-01-23_00
FILE:2016-01-23_03
FILE:2016-01-23_06
FILE:2016-01-23_09
FILE:2016-01-23_12
FILE:2016-01-23_15
FILE:2016-01-23_18
FILE:2016-01-23_21
FILE:2016-01-24_00
met_em.d01.2016-01-23_00:00:00.nc
met_em.d01.2016-01-23_03:00:00.nc
met_em.d01.2016-01-23_06:00:00.nc
met_em.d01.2016-01-23_09:00:00.nc
met_em.d01.2016-01-23_12:00:00.nc
met_em.d01.2016-01-23_15:00:00.nc
met_em.d01.2016-01-23_18:00:00.nc
met_em.d01.2016-01-23_21:00:00.nc
met_em.d01.2016-01-24_00:00:00.nc
Step Three: Run real.exe
Using the previously downloaded data (in ${PROJ_DIR}/data), output from WPS in step one, and pointing to the namelists in the local scripts directory, run the dtcenter/wps_wrf container to this time run real.exe in docker-space and map the output into the local wrfprd directory.
-v ${PROJ_DIR}/data:/data -v ${PROJ_DIR}/container-dtc-nwp/components/scripts/common:/home/scripts/common \
-v ${CASE_DIR}/wrfprd:/home/wrfprd -v ${CASE_DIR}/wpsprd:/home/wpsprd \
-v ${PROJ_DIR}/container-dtc-nwp/components/scripts/snow_20160123:/home/scripts/case \
--name run-dtc-nwp-snow dtcenter/wps_wrf:${PROJ_VERSION} /home/scripts/common/run_real.ksh
The real.exe program should take less than a minute to run, but you can follow its progress as well in the wrfprd directory:
Type CTRL-C to exit the tail utility.
Step One (Optional): Run Python to Create Image of Domain
A Python script has been provided to plot the computational domain that is being run for this case. If desired, run the dtcenter/python container to execute Python in singularity-space using the namelist.wps in the local scripts directory, mapping the output into the local pythonprd directory.
A successful completion of the Python plotting script will result in the following file in the pythonprd directory. This is the same image that is shown at the top of the page showing the model domain.
Step Two: Run WPS
Using the previously downloaded data (in ${PROJ_DIR}/data), while pointing to the namelists in the local scripts directory, run the dtcenter/wps_wrf container to run WPS in singularity-space and map the output into the local wpsprd directory.
Once WPS begins running, you can watch the log files being generated in another window by setting the ${CASE_DIR} environment variable and tailing the log files:
Type CTRL-C to exit the tail utility.
Step Three: Run real.exe
Using the previously downloaded data (in ${PROJ_DIR}/data), output from WPS in step one, and pointing to the namelists in the local scripts directory, run the dtcenter/wps_wrf container to this time run real.exe in singularity-space and map the output into the local wrfprd directory.
The real.exe program should take less than a minute to run, but you can follow its progress as well in the wrfprd directory:
Type CTRL-C to exit the tail utility.
A successful completion of the WPS steps will result in the following files (in addition to other files) in the wpsprd directory
FILE:2016-01-23_00
FILE:2016-01-23_03
FILE:2016-01-23_06
FILE:2016-01-23_09
FILE:2016-01-23_12
FILE:2016-01-23_15
FILE:2016-01-23_18
FILE:2016-01-23_21
FILE:2016-01-24_00
met_em.d01.2016-01-23_00:00:00.nc
met_em.d01.2016-01-23_03:00:00.nc
met_em.d01.2016-01-23_06:00:00.nc
met_em.d01.2016-01-23_09:00:00.nc
met_em.d01.2016-01-23_12:00:00.nc
met_em.d01.2016-01-23_15:00:00.nc
met_em.d01.2016-01-23_18:00:00.nc
met_em.d01.2016-01-23_21:00:00.nc
met_em.d01.2016-01-24_00:00:00.nc