Pre-Processing
Pre-Processing cindyhg Tue, 10/15/2019 - 10:20Running init_gfs and init_gdas
Once all configure files and the global_vars.sh script have been edited to define an experiment, the wrapper scripts should be submitted to the batch system. Some of the wrappers have dependencies on previous wrappers, while others can be run simultaneously.
The pre-processing of the different components can be submitted simultaneously. The users can submit the following wrappers simultaneously:
init_gdas_wrapper
init_ocean_wrapper
bufrprep_wrapper
Running init_gfs_wrapper and init_gdas_wrapper
HWRF needs data from the operational GFS and GDAS for its initialization procedures. Ultimately, the GFS dataset is used to create initial and boundary conditions for the 18-km outer domain, while the GDAS dataset is used to initialize the inner 6- and 2-km domains.
The GFS analysis and forecast employed are from the same cycle as the HWRF initialization. The GDAS data used by HWRF are forecasts from the previous 6-h cycle.
Two wrapper scripts are used to preprocess data for the atmospheric component of HWRF:
init_gfs_wrapper
Processing GFS and GDAS files
For processing the GFS data, exhwrf_init.py is called once, and then three more times for processing GDAS data – once at each FGAT hour (3, 6, 9). The script exhwrf_init.py runs the three stages of WPS (geogrid, ungrib, and metgrid), real_nmm (to create initial and boundary conditions for the WRF Ghost and WRF Analysis runs), wrfghost, wrfanalysis, post, gribber, and tracker. All these steps are needed for WRF initialization, and some of these are used again at later stages of the run (for example, post and tracker). As noted before, the exercise will be run for a 12 h forecast.
Start by entering the wrappers directory:
Next, copy and edit the qsub template according to the example. We need to create two scripts to submit init_gfs_wrapper and init_gdas_wrapper.
The steps for creating run.init_gfs.csh should consist of the following:
- Copy the qsub_Cheyenne_wrapper.csh template to run.init_gfs.csh and open it for editing.
-
cp /glade/p/ral/jnt/HWRF/HWRF_v3.9a_tut_codes/qsub_Cheyenne_wrapper.csh run.init_gfs.csh
-
- Read the comments at the bottom of the script and note the number of processors (96) and wallclock time (0:20) to be used for init_gfs_wrapper.
- Copy and paste the select ncpus line from the comments section to the top of the script. Remember to delete the leading comments so that the line starts with #PBS
- Change job_name to init_gfs to specify a name for the job.
- Change $WRAPPER_NAME to ${SCRATCH}/hwrfrun/wrappers/init_gfs_wrapper to specify the script to be run.
- Save and close the run.init_gfs.csh script.
Next, follow similar steps to create the run.init_gdas.csh, making sure to set the select ncpus. Be sure to read the comments at the bottom of the wrapper script to see the number of processors and wallclock time that should be used.
Finally, submit these two jobs:
qsub run.init_gdas.csh
The init_gfs and init_gdas jobs should take approximately 10 and 25 minutes to run, respectively. However, your runtimes may vary.
While these jobs are running, the init_ocean and bufrprep jobs may be submitted, as shown in the workflow graphic at the bottom of this page. After reading the rest of this page, please proceed to the following pages and submit the init_ocean and bufrprep jobs.
There are two ways you can check the job status:
When init_gfs and init_gdas have completed successfully, the standard output files will end with:
The ${WORKhwrf}/intercom subdirectories gfsinit, fgat.t201610032100, fgat.t201610040000, and fgat.t201610040300 will have the outputs from the different components:
gfs.track0.atcfunix
ghost/ wrfanl_d02_2016-10-04_00_00_00, wrfanl_d03_2016-10-04_00_00_00
realinit/ fort.65, rsl.out.0000, wrfbdy_d01, wrfinput_d01
regribber/ matthew14l.2016100400.hwrftrk.grbf00, matthew14l.2016100400.hwrftrk.grbf00.grbindex, quarter_degree.grb, subset.grb
wps/ geo_nmm.d01.nc, geo_nmm_nest.l01.nc, geo_nmm_nest.l02.nc, met_nmm.d01.2016-10-04_00_00_00.nc, met_nmm.d01.2016-10-04_06_00_00.nc
wrfanl/ trankin_d01, wrfanl_d02_2016-10-04_00_00_00, wrfanl_d03_2016-10-04_00_00_00
prep_hybrid hwrfinit_0 and hwrfbcs_${BC_INDEX}, the variable bc_index=0,1,2 corresponds to the GFS forecast lead times. If running for 126 hrs it will produce 0,1,...21 GFS forecast times. Also, the log files of all the forecast lead times are present.
Visualizing outputs
The geogrid program defines simulation domains, and interpolates various terrestrial datasets to the model grids.
To see the contents in the d01 domain,
|
cd ${WORKhwrf}/intercom/gfsinit/wps
ncview geo_nmm.d01.nc |
The metgrid program horizontally interpolates the intermediate-format meteorological data that are extracted by the ungrib program onto the simulation domains defined by the geogrid program. The interpolated metgrid output can then be ingested by the real.exe program.
The real program of WRFV3 produces the initial and boundary conditions for the parent domain.
To view the boundary values
To view the wrf input values
The WRF is run for for 60 secs to generate preliminary initial conditions for nest domains (wrfanl_d02 and wrfanl_d03). The IC for the nest will be further modified later.
ncview wrfanl_d02_2016-10-04_00_00_00
ncview wrfanl_d03_2016-10-04_00_00_00
The WRF is run for 60 secs to generate initial conditions for the ghost domains.
ncview wrfanl_d02_2016-10-04_00_00_00
ncview wrfanl_d03_2016-10-04_00_00_00
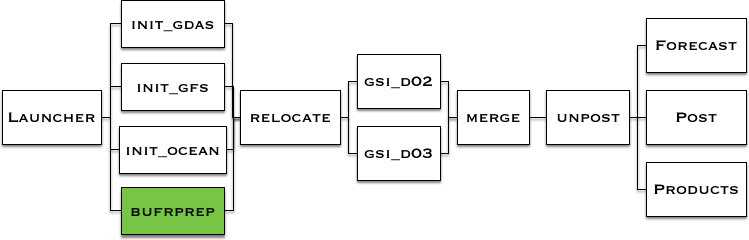
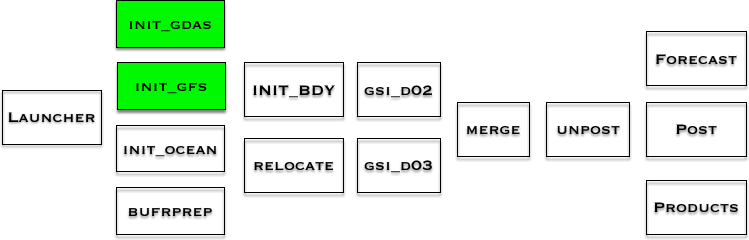
Where in the process of running HWRF?
This chart shows the workflow of the HWRF system. The green box(es) show the step(s) just completed. The components stacked together can be run simultaneously.
Ocean Initialization
Ocean Initialization cindyhg Tue, 10/15/2019 - 10:30Running init_ocean
The initialization of the HWRF ocean model, MPIPOM-TC, is accomplished by running the init_ocean_wrapper, which is responsible for linking the ocean executables from the exec/ directory and running exhwrf_ocean_init.py to generate updated initial conditions for the ocean forecast component of HWRF. GDEMv3 is used to generate the initial condition.This step may be done prior to the completion of the init_gfs and init_gdas jobs submitted on the previous page.
Start by entering the wrappers directory:
Next, copy and edit the qsub template according to the example.
Finally, submit the job:
The init_ocean job should take approximately 15 minutes to run, but your runtime may vary.
While this job is running, the bufrprep job may be submitted, as shown in the workflow graphic at the bottom of this page. After reading the rest of this page, please proceed to the following page and submit the bufrprep job.
The following indicate that init_ocean has completed successfully:
- The standard output file (init_ocean*.out) will say: Setting RUN_COUPLED=YES in status file
- The file ${WORKhwrf}/pom/output/OCEAN/getsst.out will now exist.
- The following files will now exist and end with POM terminated successfully:
For a more detailed list of the output, please refer to Chapter 8 of the HWRF Users Guide.
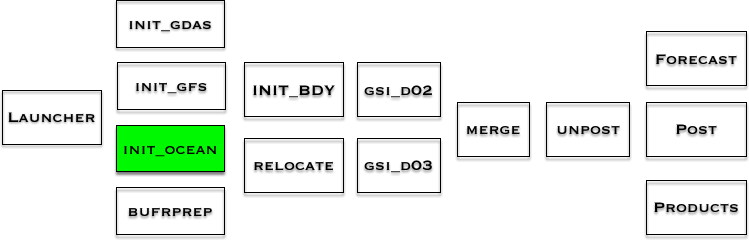
Where in the process of running HWRF?
This chart shows the workflow of the HWRF system. The green box(es) show the step(s) just completed. The components stacked together can be run simultaneously.
Bufrprep
Bufrprep cindyhg Tue, 10/15/2019 - 10:36Running bufrprep
The HWRF data assimilation component begins by running a data preparation script, bufrprep_wrapper, which calls scripts/exhwrf_bufrprep.py. The prepbufr processing algorithm is based on the value of the bufrprep.prepbufrprep flag in hwrf.conf. The options are:This step may be done prior to the completion of the init_gfs, init_gdas, and init_ocean jobs submitted on previous pages.
- Make no change. Do not run a program.
- Remove some inner-core data.
- flag/unflag mass and dropsonde u, v data
- unflag HS3 dropsonde data, then reflag near center to be consistent with other drops (Default)
- Option 3 + unflag u/v dropsonde data near center below a certain wind threshold
Start by entering the wrapper directory:
Next, copy and edit the qsub template according to the example.
Finally, submit the job:
The bufrprep job should take less than 1 minute to run, but your runtime may vary.
The following indicate that bufrprep has completed successfully:
- The standard output file (bufrprep*.out) will say: gsi status file says gsi init succeeded.
- The GSI status file ${COMIN}/gsi_status.MATTHEW14l.2016100400 will now exist.
Where in the process of running HWRF?
This chart shows the workflow of the HWRF system. The green box(es) show the step(s) just completed. The components stacked together can be run simultaneously.